
When starting your FPV journey, most of your attention usually goes to the drone, video system, or controller, while the battery is often seen as nothing more than a simple power source. In reality, it’s one of the most important parts of an FPV drone. It determines not only how long you can fly, but also how the drone behaves in the air.
Oh, and they’re expensive. You’ll need more than one. So it’s good to know a little more about them 😉
Disclaimer
This article is for informational purposes only. By using batteries, you take full responsibility for your actions. Before doing anything with batteries, read the instructions provided with both the battery and the battery charger you are using.
Don’t stop there — be sure to also check the drone manufacturer’s instructions if you purchased a pre-built drone, as well as the recommended voltage ratings specified in the documentation for your drone’s components.
Choosing the right FPV drone battery allows you to get the most out of your drone. It has a direct impact on flight time, maximum motor power, drone weight, responsiveness to controls, and even flight safety. A battery that is too weak may not be able to deliver the required current, making the drone feel sluggish and causing the voltage to drop faster. During more extreme maneuvers, the voltage may even drop so low that the flight controller reboots — and the drone falls out of the sky.
On the other hand, a bigger battery isn’t always a better choice. A higher capacity might seem to mean longer flight time, but it also increases the weight of the drone. A heavier drone becomes less agile, requires more power to stay in the air, and in some cases may ultimately fly for even less time than with a smaller battery. That’s why you’re always looking for a balance between power, weight, and flight time.
You can compare it to a sports car. If you buy a Ferrari, you wouldn’t fill the tank with the lowest-quality fuel and still expect maximum performance. The same applies to an FPV drone. Even the best frame, the most powerful motors, and the most advanced flight controller won’t reach their full potential if they’re powered by the wrong battery — or a worn-out one.
In this guide, I’ll try to cover not only the different FPV battery technologies, but also battery markings, voltages, connectors, charging, storage, maintenance, common mistakes, and plenty of other things I really wish I had known from day one in this hobby.
By understanding these basics, you’ll not only be able to keep your batteries in good condition for longer, but also get better performance and more useful life out of them.
Table of Contents
- Battery markings
- Battery capacity
- Cells — what are they?
- Why does a battery have two connectors?
- C rating
- Battery technologies
- Different battery voltages
- Battery connectors
- Which batteries for which drones?
- Battery charging
- Battery storage
- Voltage sag
- Internal resistance — IR
- Battery lifespan
- How much do batteries cost?
- When is it time to say goodbye to a battery?
- Battery disposal
- TL;DR — the minimum you should remember
- The biggest and most common mistakes
- What do I use?
Battery markings
The first time you pick up an FPV drone battery, it might seem like it’s covered in nothing but mysterious numbers and letters. 6S, 1300 mAh, 120C, XT60, LiHV — some kind of nonsense meant for someone with a PhD in physics.
In reality, these markings quickly tell you the most important characteristics of a battery — its voltage, capacity, how much current it can deliver, and even what kind of drone it is intended for.
Here are a couple of battery examples:
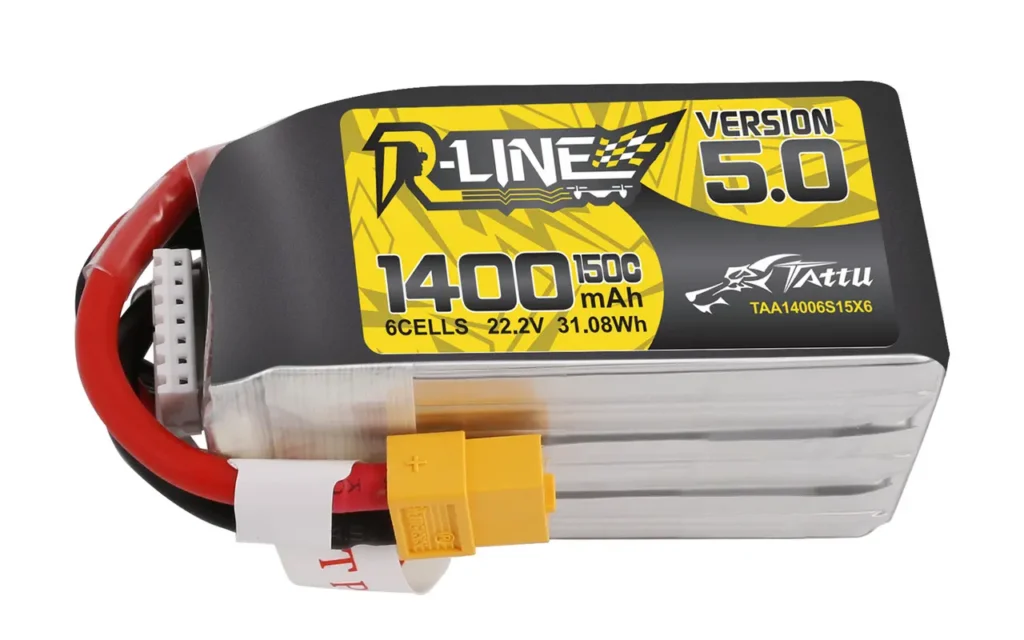
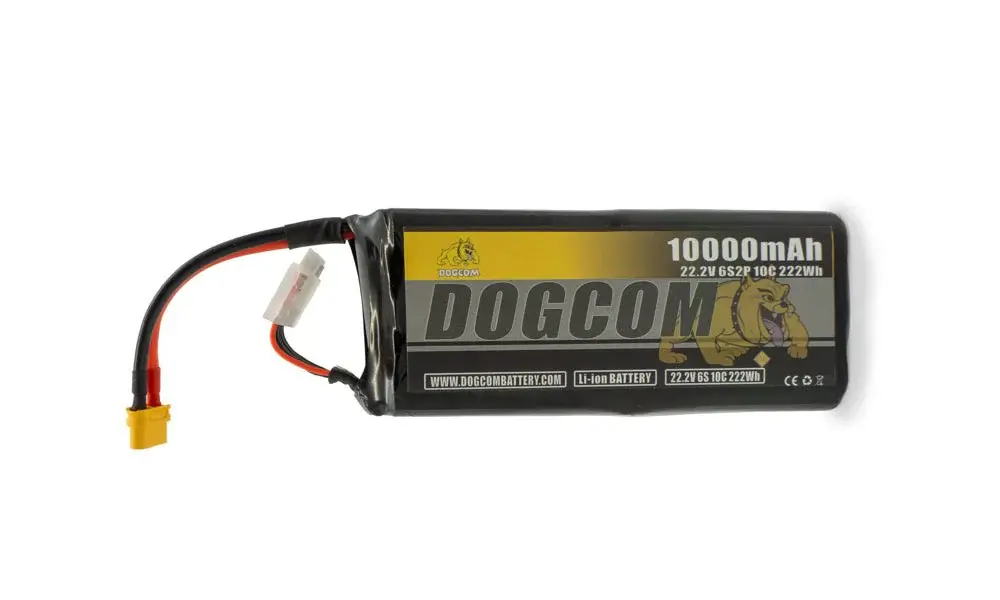
| What Do We See? Tattu R-Line Version 5.0 and Dogcom — the battery brand/manufacturer/models. 1400 mAh and 10,000 mAh — battery capacity. It indicates how much charge the battery can store. Higher capacity usually means longer flight time, but it also increases battery weight. We’ll talk more about choosing the right capacity later. 6 Cells and 6S2P — the number and arrangement of cells. This determines the battery voltage. 22.2 V — the battery’s nominal voltage. A single lithium cell has a nominal voltage of 3.7 V, so a 6S battery has a nominal voltage of 22.2 V (3.7 × 6 = 22.2 V). This marking is usually one of the first things that helps you determine which drone the battery is suitable for. | 150C and 10C — the maximum discharge rate. In theory, this indicates how much current the battery can deliver without damaging its cells. However, it’s worth knowing that C ratings are not standardized across manufacturers and are often optimistic, so you shouldn’t blindly rely on this number alone. 31.08 Wh and 222 Wh — the nominal amount of energy stored in the battery. This value isn’t always listed. It is calculated by multiplying the battery’s capacity by its nominal voltage. Li-ion battery — the battery technology. In the first example, the battery chemistry isn’t specified on the label itself, but its product description would identify it as a LiPo battery. What else should you check? Battery connector — XT60 in both of these examples. We’ll talk more about battery connectors a little later. |
Battery capacity
One of the first numbers you’ll see on an FPV drone battery is its capacity, usually specified in mAh (milliamp-hours). It tells you how much charge the battery can store. Simply put, the higher the capacity, the longer the battery can potentially power the drone. However, this doesn’t mean that a higher-capacity battery is always the better choice.
Higher-capacity batteries are heavier. More weight means the motors have to lift a heavier drone, which increases energy consumption. Because of this, twice the capacity almost never means twice the flight time. In addition, higher-capacity batteries from the same manufacturer and product line usually cost more.
For example, if you use a 2200 mAh battery instead of a 1300 mAh battery on a 5-inch freestyle drone, the flight time will most likely increase, but the drone will become significantly heavier, less maneuverable, and slower to respond to your controls. A smaller battery, on the other hand, keeps the drone lighter and makes it feel more responsive in the air. It’s also worth mentioning that you shouldn’t use batteries with drastically different weights on the same drone, because a significant change in weight may require you to adjust the drone’s settings — perhaps even the camera angle — to make it fly the way you’re used to.
That’s why, when choosing battery capacity, it helps to know what the drone will be used for and what style you plan to fly. It’s always a compromise between flight time and weight. Freestyle pilots usually choose lighter batteries, while long range drones often use higher-capacity Li-ion batteries because the main priority is achieving the longest possible flight time, while maneuverability is less important.
Cells — what are they?
It’s worth understanding what a cell actually is 🙂 The simplest way to think of it is as a single, individual battery element. For example, a single AA or AAA battery is essentially one cell. Of course, AA and AAA batteries use completely different chemistry and have different voltages than the lithium batteries used in FPV drones, but it’s still a pretty good analogy for understanding the concept.
In the FPV world, lithium batteries are by far the most common, and a single cell typically has a nominal voltage of around 3.7 V. By connecting several cells together into a battery pack, we get the battery that powers the drone. In lithium-ion (Li-ion) batteries, the cells are usually cylindrical and come in standardized sizes such as 18650, 20700, or 21700. These numbers aren’t random — they indicate the dimensions of the cell in millimeters. For example, an 18650 cell is approximately 18 mm in diameter and 65 mm long, while a 21700 cell is 21 mm in diameter and 70 mm long.
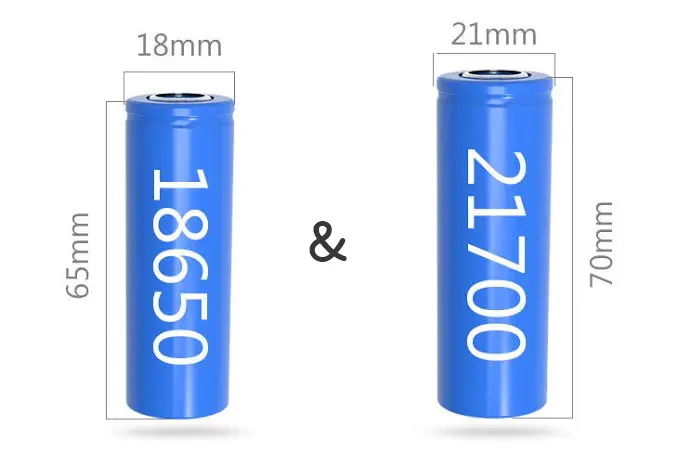
FPV LiPo batteries, on the other hand, use flat pouch cells rather than cylindrical cells. You usually can’t even see the individual cells from the outside because the entire battery pack is wrapped in protective heat-shrink film.
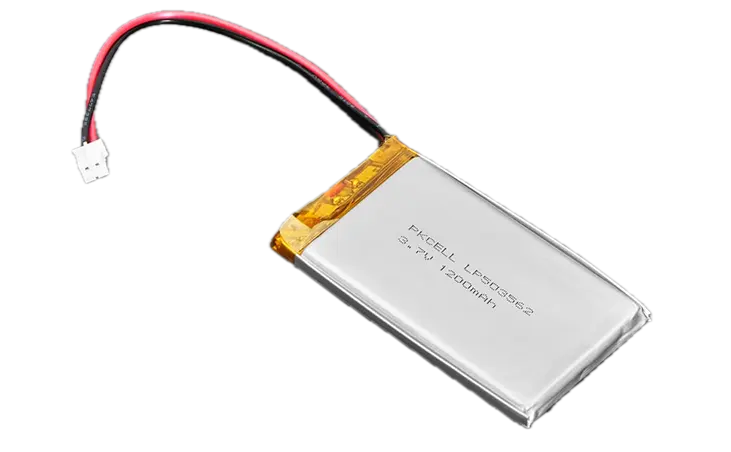
Regardless of whether a battery consists of cylindrical Li-ion cells or flat LiPo cells, the way those cells are connected determines markings such as 4S, 6S, or 6S2P.
Cell count and markings
One of the most important markings on an FPV drone battery is a number followed by the letter S. It indicates how many lithium cells are connected in series. Each lithium cell has a nominal voltage of around 3.7 V, so as the number of cells connected in series increases, the total battery voltage increases as well.
For example, a 4S battery consists of four cells connected in series and has a nominal voltage of 14.8 V, while a 6S battery consists of six cells and has a nominal voltage of 22.2 V. This is why a 6S battery shouldn’t be thought of as simply “bigger” than a 4S battery. It operates at a higher voltage and is therefore usually used in drones whose electronics and motors are designed to handle that voltage.
The most common configurations are:
| S marking | Cell count | Nominal voltage |
|---|---|---|
| 1S | 1 | 3.7 V |
| 2S | 2 | 7.4 V |
| 3S | 3 | 11.1 V |
| 4S | 4 | 14.8 V |
| 6S | 6 | 22.2 V |
| 8S | 8 | 29.6 V |
What does the letter P mean?
Sometimes you’ll see an additional marking on a battery, such as 6S2P or 4S2P. The letter P indicates how many cells are connected in parallel within each series group. Connecting cells in parallel does not increase the battery voltage, but it does increase its capacity and allows the battery pack to deliver more current. For example:
- 6S1P — six cells connected in series, with one cell in each series group. This is a typical 6S LiPo battery with six cells in total.
- 6S2P — six groups connected in series, with two cells connected in parallel in each group. This battery has 12 cells in total.
For example, if 3000 mAh cells are used:
- A 6S1P battery will have a capacity of 3000 mAh.
- A 6S2P battery will have a capacity of 6000 mAh.
- A 6S3P battery will have a capacity of 9000 mAh.
Of course, the battery’s weight and physical size increase as more cells are added in parallel.
Why don’t LiPo batteries usually have a P marking?
On many typical LiPo batteries, you’ll only see markings such as 4S, 6S, or 8S, without a 1P designation. This is because most FPV LiPo battery packs use a single cell in each series group, meaning they are effectively 4S1P, 6S1P, and so on. The 1P is simply omitted because it is implied.
With Li-ion battery packs, on the other hand, connecting cells in parallel is very common, so the P marking appears much more often.
Why does a battery have two connectors?
If you’ve only used regular household batteries or rechargeable batteries until now, you might be surprised to see that most FPV drone batteries have two connectors. Why are both needed?
Almost all 2S and larger batteries, with rare exceptions, have two separate connectors. The first is the main power connector, which has two wires: positive (+) and negative (−). This connector supplies power to the drone during flight. During charging, the main charging current also flows through it.
The second is the balance connector. Its wires are much thinner because only a small amount of current flows through them. This connector allows the charger to monitor the voltage of each cell individually. During balancing, the charger equalizes the voltage of the cells in the battery. If it detects that one cell is charging faster than the others, it slightly slows the charging of that cell. The number of wires in the balance connector depends on the battery’s S count. A 2S battery has three wires, a 3S battery has four, and so on — in short, the number of balance wires is always the S count + 1.
Why is this important? Even though all the cells in a battery are the same, over time their voltages begin to differ slightly. One cell may charge faster, while another may charge more slowly. If the battery were charged only through the main connector, the charger would see only the total battery voltage and wouldn’t be able to determine whether all the cells were charged equally.
That’s why both connectors are used when charging multi-cell batteries: the main connector carries most of the charging current, while the balance connector allows the charger to monitor each cell individually. During flight, only the main power connector is used because the drone only needs the battery’s total voltage.
C rating
One of the most commonly advertised battery parameters is the discharge C rating. Manufacturers often proudly display numbers such as 100C, 120C, or even 150C, creating the impression that the higher the number, the better the battery. But what does this C actually mean, and is it really worth paying attention to?
The C rating indicates the maximum discharge current that the battery can theoretically deliver.
The higher the C rating, the more current the battery can theoretically supply. In practice, a battery capable of delivering the required current will be better able to maintain its voltage when you suddenly increase the throttle, resulting in less voltage sag (a drop in voltage under load) and more consistent performance.
What is 1C? It is the discharge current that would theoretically fully discharge the battery in one hour. For example, if the battery capacity is 1300 mAh (1.3 Ah), then:
| C rating | Current (A) |
|---|---|
| 1C | 1.3 A |
| 10C | 13 A |
| 50C | 65 A |
| 100C | 130 A |
| 120C | 156 A |
There is one catch, though. Unlike cell count or capacity, the C rating is not strictly standardized. Manufacturers determine it using their own testing methods, so two batteries from different manufacturers that both have 120C printed on them may have significantly different real-world discharge capabilities. That’s why measurements from independent testers are often more useful than relying solely on the C rating declared by the manufacturer. Of course, if you’re comparing batteries from the same manufacturer, things are a little simpler.
For this reason, experienced FPV pilots usually treat the C rating as only a rough guideline. Independent testing and the experience of other pilots can tell you much more about a battery’s actual performance. An increase in the battery’s internal resistance over time can also reveal a lot about its condition.
So, when choosing a battery, you shouldn’t blindly chase the highest possible C rating. It is much more important to choose batteries from a reputable manufacturer that can maintain stable voltage under real-world conditions and continue performing reliably over many flights.
Of course, this naturally raises another question — where do you actually use that C rating? If a battery can deliver 156 A, how do you know whether that’s enough for your drone?
The battery is connected to the ESC. An ESC has its own current rating. For example, a SpeedyBee 45A 4-in-1 ESC uses four ESCs on a single board, with each one rated to handle up to 45 A of current flowing to a motor. In theory, four ESCs rated at 45 A each gives us 45 × 4 = 180 A.
However, it’s important to understand that these are the maximum current limits the ESCs are designed to handle — not necessarily the amount of current the motors will actually draw. The actual current drawn from the battery depends on the motors and propellers connected to the system. If you’re buying a pre-built drone, you generally don’t need to worry about calculating this yourself. If you’re building the drone yourself, however, it’s worth checking the motor specifications and test data.
For example, let’s look at a test table provided by an FPV motor manufacturer:
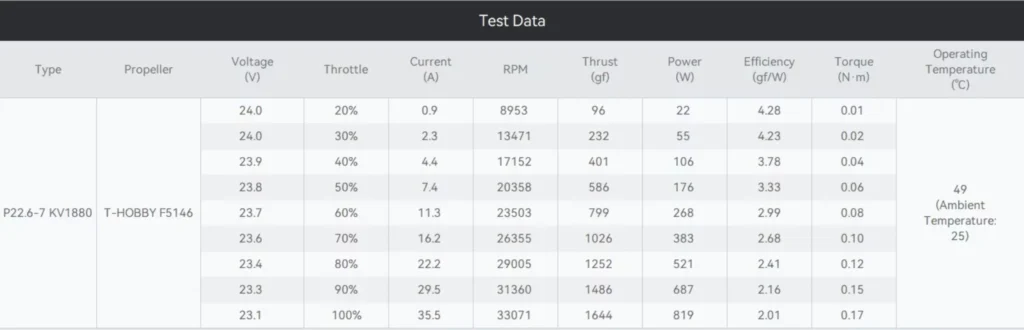
We can see that with the specified propeller and a 6S battery, the motor draws around 35.5 A at 100% throttle. With four identical motors, that gives us a theoretical total of: 35.5 A × 4 = 142 A
But that’s only if you’re at 100% throttle, which doesn’t happen very often or for very long during a real flight. And even when it does, it usually lasts only a few seconds.
By the way, a higher C rating does not automatically give the drone more power. If two batteries of the same capacity and similar quality differ only in that one is rated at 100C and the other at 150C, the drone will not necessarily be faster or more powerful with the 150C battery. A higher C rating simply means that the battery is theoretically capable of delivering more current. In practice, it may handle high loads with less voltage sag. However, if the 100C battery already meets the drone’s current requirements without excessive voltage sag, the 150C rating alone won’t provide any additional benefit.
One more “by the way” — C ratings can also be used to describe charging current, not just discharge current.
Battery technologies
In the FPV world, four lithium battery technologies are commonly used — or, more precisely, two main technologies, each with two variations. Although they all work on similar basic principles, each has its own advantages and disadvantages.
One battery technology allows you to squeeze out maximum power for acrobatic flying, while another prioritizes energy density and longer flight times. Some variations build on those technologies to offer slightly different characteristics. That’s why, when choosing an FPV drone battery, it’s important to understand not only its capacity and cell count, but also the battery technology itself.
Lithium polymer — LiPo
LiPo, or lithium polymer, batteries are probably the most common choice in the FPV world. You’ll find them in many freestyle, racing, and cinewhoop drones. Their biggest advantage is their ability to deliver very high current. That’s why they work so well in drones that need to respond quickly to sudden throttle changes and other high-current demands.
On the other hand, this comes at a cost. Compared with lithium-ion (Li-ion) batteries, LiPo batteries store less energy for the same weight, so flight times are usually shorter. More importantly, they are more sensitive to improper storage and require more care.
If your goal is aggressive freestyle or racing, LiPo is usually the most suitable choice.
Advantages
- very high current output;
- well suited to aggressive freestyle and racing;
- wide range of options available.
Disadvantages
- lower energy density than Li-ion;
- require more careful storage and maintenance.
High-voltage lithium polymer — LiHV
At first glance, LiHV batteries look almost identical to LiPo batteries. In fact, the two technologies are very closely related. The main difference is that a LiHV cell can be charged up to 4.35 V, while a standard LiPo cell is normally charged up to 4.20 V. Because of this higher maximum charge voltage, LiHV batteries can store slightly more energy and start a flight at a higher voltage.
However, the difference isn’t huge. In practice, the main advantage is a modest increase in stored energy and a slightly higher voltage at the beginning of the flight.
The most important thing to remember is that LiHV batteries need a charger that supports LiHV charging if you want to charge them to their full 4.35 V per cell. If you charge a LiHV battery using the regular LiPo mode, which normally stops at 4.20 V per cell, it simply won’t be fully charged. I’ve made this mistake more than once myself when I was in a hurry.
Advantages
- slightly higher energy capacity than standard LiPo;
- higher fully charged voltage.
Disadvantages
- require LiHV-compatible charging;
- the advantage over standard LiPo is relatively small;
- charging to the higher voltage may reduce battery lifespan.
Lithium-ion — Li-ion
While LiPo batteries are well suited to high-power flying, lithium-ion batteries prioritize energy density and flight time.
Li-ion batteries can store more energy for the same weight than typical FPV LiPo batteries, making them an excellent choice for long range flying. This is why they are commonly used on larger FPV drones built for longer flights.
However, higher energy density comes at a cost. Typical Li-ion cells cannot deliver as much current as high-discharge LiPo cells, so they are generally less suitable for aggressive freestyle or racing.
Li-ion batteries are most commonly built using cylindrical cells, such as 18650 and 21700 cells.
Advantages
- long flight times;
- high energy density;
- generally good cycle life.
Disadvantages
- lower maximum discharge current than high-discharge LiPo;
- less suitable for aggressive freestyle and racing.
Tabless lithium-ion
In recent years, the term tabless has been appearing more and more often. This isn’t a new battery chemistry — it’s a different Li-ion cell design. In conventional Li-ion cells, current reaches the external terminals through relatively narrow conductive tabs. In a tabless design, the current path is distributed across a much larger area of the electrode. This can reduce internal resistance and heat generation while allowing the cell to deliver more current. In other words, tabless technology can bring some Li-ion cells closer to LiPo-like current performance while retaining the high energy density that makes Li-ion attractive in the first place.
Even so, high-current tabless Li-ion cells generally still don’t match high-discharge LiPo batteries when very high burst current is required.
Advantages
- potentially lower internal resistance;
- higher discharge current than conventional Li-ion cells of a similar type;
- potentially less heat generation under high load;
- well suited to long range builds that need more current than traditional Li-ion packs can provide.
Disadvantages
- often more expensive;
- still generally behind high-discharge LiPo in maximum current capability.
Different battery voltages
Up to this point, I’ve mainly used one term when talking about battery voltage — nominal voltage. However, several other voltage values are commonly used when talking about FPV drone batteries. Why do we need them, and what do they actually mean?
Each of these voltage values means something different and is used in different situations. For example:
- Nominal voltage — the reference voltage commonly used to describe a battery cell, or simply its voltage “on paper.” (OK, I agree — this is probably the one you’ll use the least.)
- Fully charged voltage — a very important number. This is the maximum voltage to which the battery should be charged under normal use. Charge it to a lower voltage — no problem, you’ll simply have less energy available for the flight. Charge it above the specified maximum — a big no, no, no. At the very least, you can accelerate cell degradation; in the worst case, you can create a serious fire hazard.
- Storage voltage — keeping lithium batteries fully charged for long periods isn’t good for them and accelerates degradation. That’s why lithium batteries are normally stored at a lower voltage known as storage voltage. We’ll return to this in much more detail later in the article.
- Recommended landing voltage — as the name suggests, this is the voltage at which you should be thinking about ending the flight. There’s a reason for that recommendation: if the battery voltage drops too far under load, you risk reaching the point where the drone’s electronics no longer receive enough voltage to keep operating reliably.
You’re flying along, everything seems fine, and then suddenly the drone starts coming down on its own. Unfortunately, I don’t have the link anymore, but just a few days ago I saw a video on Instagram where a guy got so caught up in filming that he completely forgot to keep an eye on the battery voltage. And, of course, he was flying over water. The voltage dropped too far and — bam. Well, at least his goggles captured a nice video of an expensive lesson. - Practically empty voltage (Fully discharged voltage) — at this point, the battery is effectively empty for normal FPV use. You definitely shouldn’t arm the drone and try to fly with it at this voltage. You might still be able to power something less demanding, such as FPV goggles, but continuing to discharge the battery risks taking the cells to a dangerously low voltage.
- Dangerously discharged (cut-off voltage) — below this point, the risk of irreversible cell damage increases significantly. A battery that has been discharged this far may not show any dramatic symptoms immediately, but attempting to recharge a severely over-discharged lithium battery can be dangerous.
Typical voltage per cell:
| Battery state | LiPo | LiHV | Li-Ion & Li-Ion Tabless |
|---|---|---|---|
| Nominal voltage | 3.7 V | 3.8 V | 3.6-3.7 V |
| Fully charged voltage | 4.20 V | 4.35 V | 4.20 V |
| Storage voltage | 3.8–3.85 V | 3.8–3.85 V | 3.60–3.80 V |
| Recommended landing voltage | ~3.5 V | ~3.5-3.6 V | ~3.2–3.3 V |
| Practically empty. Do not arm the drone at this voltage, and during flight, avoid letting the battery reach this level. | ~3.3 V | ~3.4 V | ~3.0 V |
| Cut-off voltage — avoid using the battery below this point. | <3.0 V | <3.0 V | <2.5–2.8 V |
The voltage you see during flight also depends on the load. When you suddenly increase the throttle, the voltage can temporarily drop by several tenths of a volt due to an effect known as voltage sag. Once you reduce the throttle, the voltage rises again. That’s why, when estimating how much battery capacity you have left, you should consider not only the voltage under load, but also the voltage after it has stabilized.
Battery connectors
When choosing an FPV drone battery, it’s important to pay attention not only to its capacity and cell count, but also to its main power connector. This is what transfers electrical power from the battery to the drone. If the connectors on the battery and the drone don’t match, you simply won’t be able to connect them without an adapter or replacing one of the connectors.
OK, buying a drone and a battery with different connectors may not be the most common mistake. But when it’s time to charge the battery and you discover that your charger doesn’t have the right connector, you’ll still have to spend some time finding an adapter — or soldering one yourself.
Different sizes of drones use different connectors. For tinywhoops, keeping weight as low as possible is one of the main priorities, so very compact connectors are used. Larger 5- or 7-inch drones, on the other hand, can draw well over 100 A in short bursts, so they require much more robust connectors.
Below are the battery connectors you’ll most commonly encounter in the FPV hobby.
PH2.0
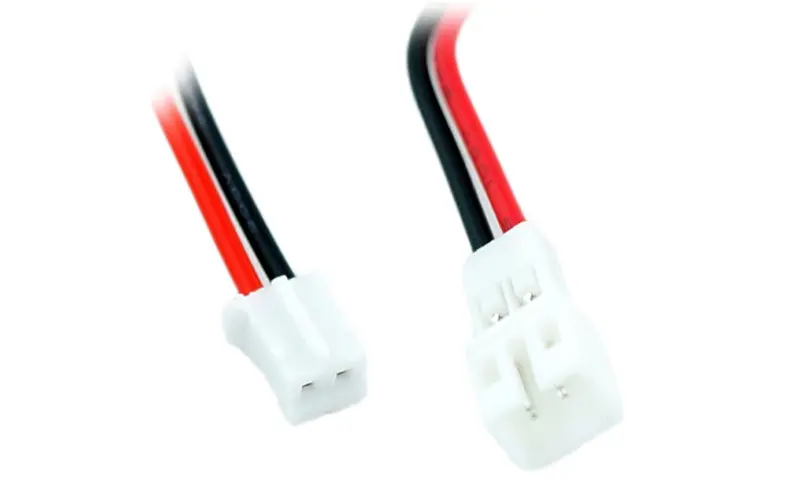
PH2.0 was the standard connector for 1S tinywhoop batteries for a long time. It is small, inexpensive, and widely available, but it has one significant drawback — its relatively high contact resistance can cause more voltage drop under load. For this reason, it has increasingly been replaced by newer connectors.
Most commonly used for: older 1S tinywhoop drones.
BT2.0
BT2.0 is one of the most popular modern 1S connectors and was developed by BetaFPV in 2019. It has lower contact resistance than PH2.0, allowing it to carry more current with less voltage drop.
If you’re choosing a new 1S tinywhoop, BT2.0 is generally a better option than the older PH2.0 connector.
Most commonly used for: 1S tinywhoop drones.
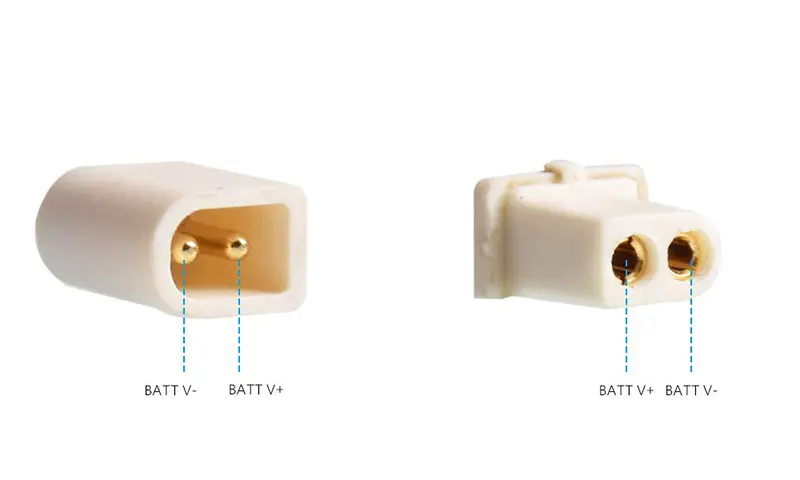
GNB27
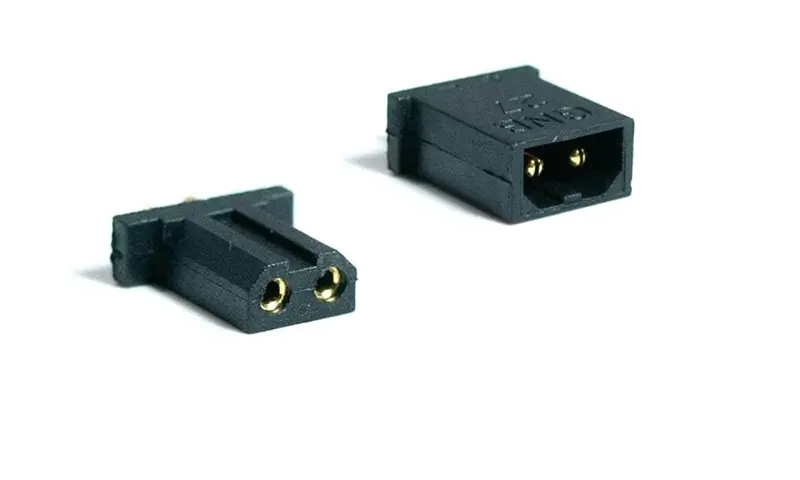
GNB27 is another newer 1S connector, developed by GNB (Gaoneng) around 2020. It was designed to minimize power losses and improve durability. It is slightly larger than BT2.0, but offers lower resistance and less voltage drop. As far as I can tell, this connector never really caught on, and GNB later released another connector — the A30.
Most commonly used for: 1S tinywhoop drones.
A30
A30 appeared around 2023 as an alternative to BT2.0. Its contacts also have low resistance, allowing it to efficiently carry the high currents required by small 1S drones.
Although its technical characteristics are very similar to BT2.0, the two connectors are not fully interchangeable. From what I found online, drones with a BT2.0 connector can use batteries with an A30 connector, but not the other way around. BT2.0 chargers can also be used to charge A30 batteries.
Most commonly used for: 1S tinywhoop drones.
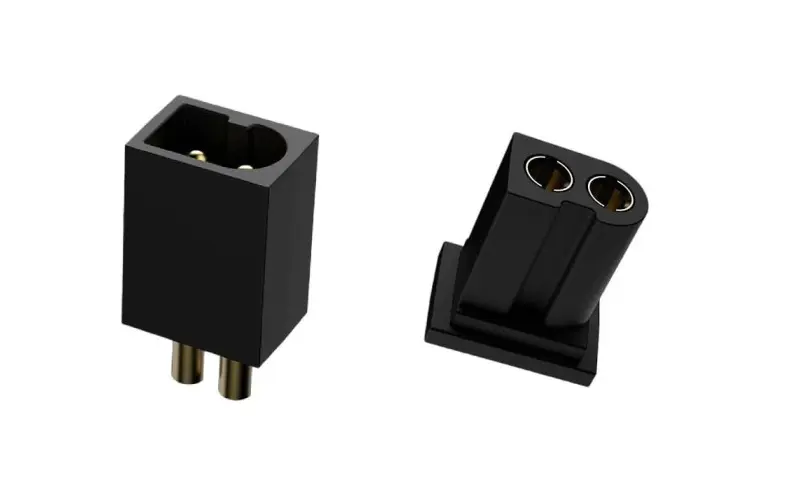
EM2.0
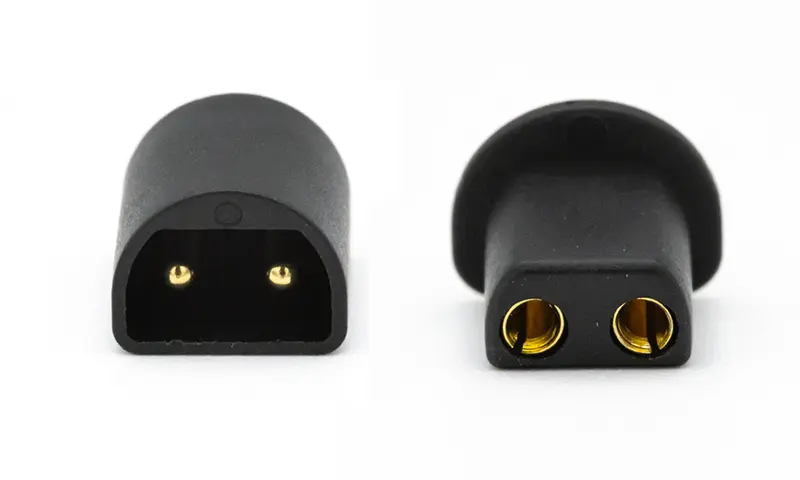
EM2.0 is another connector for small drones, this time from EMAX, a manufacturer of drones and drone parts. It doesn’t seem to have gained much popularity in the FPV world. Personally, I would avoid choosing this connector unless you already have an EMAX drone that uses it and don’t plan to expand your drone fleet.
Most commonly used for: 1S tinywhoop, 2S toothpick drones.
NX69
The newest member of the 1S tinywhoop battery connector family in this comparison comes from NewBeeDrone. It appeared in the second half of 2025.
It’s still too early to tell how widely NX69 will be adopted. Its main practical advantage is backward compatibility with PH2.0 on the battery side: NX69 batteries can be used with drones that have PH2.0 connectors. However, the reverse is not true — PH2.0 batteries cannot be used with drones equipped with NX69 connectors.
Most commonly used for: 1S tinywhoop drones.
BT3.0
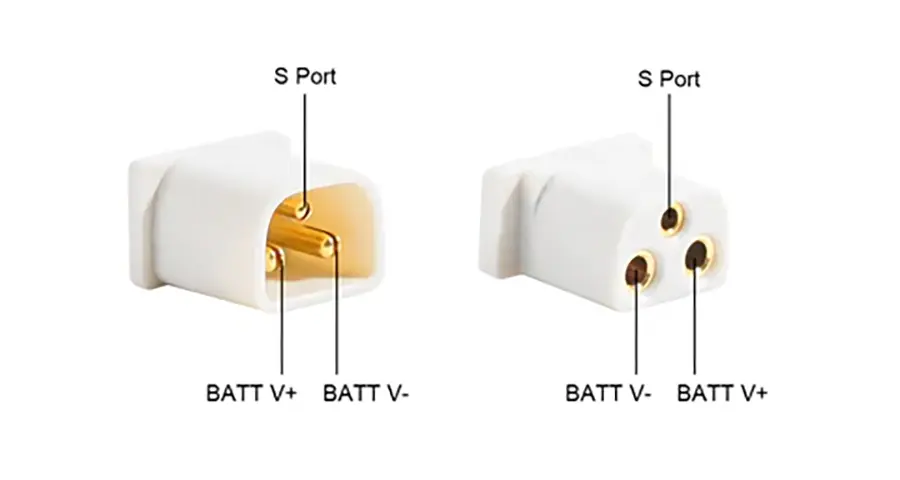
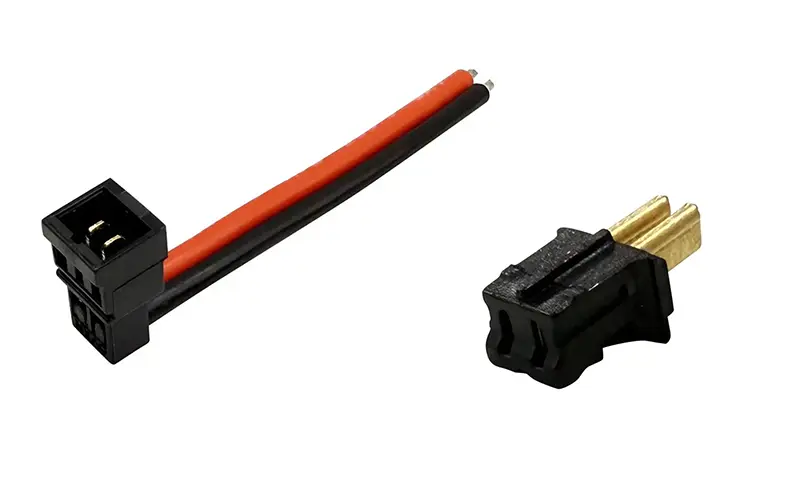
BT3.0 is a connector developed by BetaFPV for 2S micro drones that require higher current. It can carry significantly more power than BT2.0 while remaining lightweight.
Most commonly used for: 2S tinywhoops and lightweight micro drones.
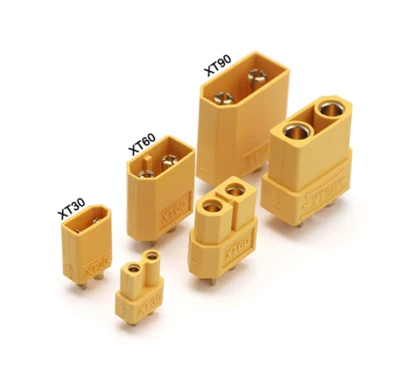
XT-30
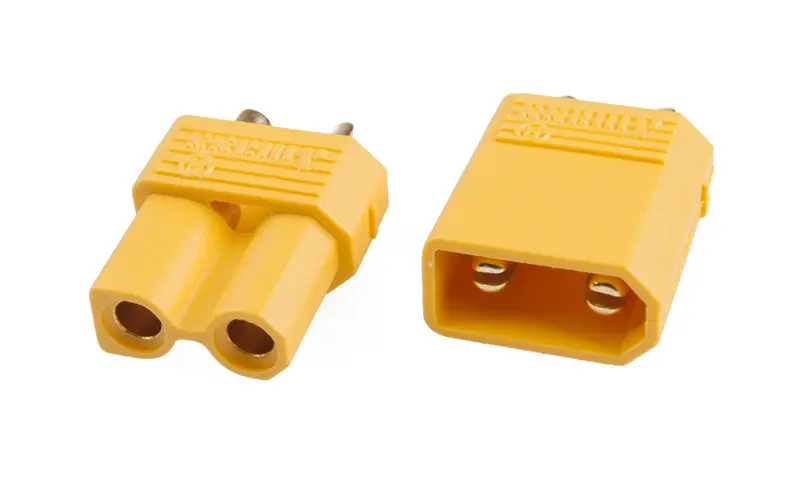
XT30 is one of the most common connectors for smaller FPV drones. It is lightweight, reliable, and can handle currents in the tens of amps.
Most commonly used for: 2S–4S drones, although it can sometimes be found on 1S batteries and even 6S batteries.
XT-60
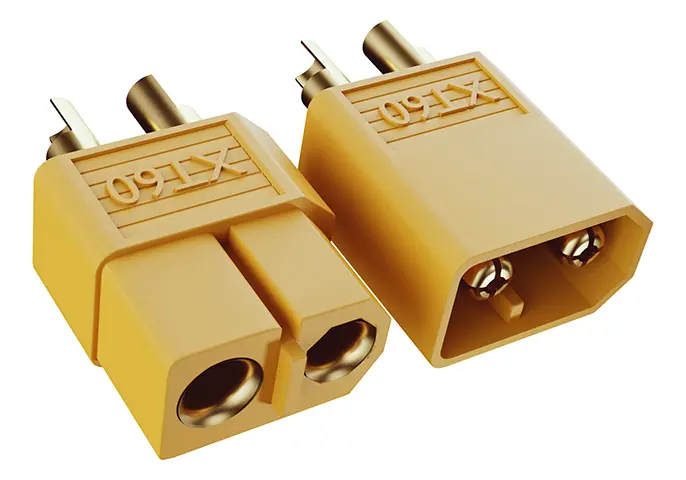
XT60 has been a standard connector for medium- and large-sized FPV drones for many years. It can handle high currents reliably, which is why it is commonly found on 5-inch freestyle drones, larger cinewhoops, and many long range builds.
Most commonly used for: 3S–6S FPV drones, especially 5- and 7-inch builds.
XT-90
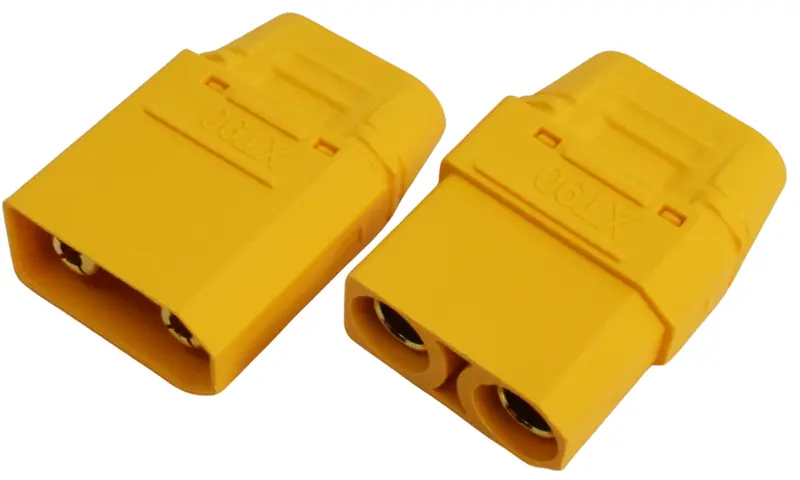
XT90 is a larger version of the XT60 connector, designed for higher-current applications. Its larger contacts can handle heavier loads, making it better suited to high-power systems.
Most commonly used for: large FPV builds, including some 10-inch and larger long range drones. It is rarely used on typical 5-inch freestyle drones, where its extra size and weight usually provide little benefit.
| Connector | Nominal current | Max current | Commonly used with: |
|---|---|---|---|
| PH2.0 | 2 A | 2 A | 1S |
| BT2.0 | 9 A | 15 A | 1S |
| A30 | 15 A | 30 A | 1S |
| GNB27 | 9 A | 15 A | 1S |
| EM2.0 | 10 A | 20 A | 1S–2S |
| NX69 | ? | 26 A | 1S |
| BT3.0 | 12 A | 20 A | 2S |
| XT30 | 15 A | 30 A | 2S–4S |
| XT60 | 30 A | 60 A | 3S–6S |
| XT90 | 45 A | 90 A | 6S+ |
Looking at this table, a more attentive reader might ask: “Wait a minute — the connector specifications list currents this low, but the C ratings of the batteries suggest they can deliver several times more current.” The same question comes up with the SpeedyBee ESC discussed earlier, which is rated at 45 A per motor channel.
This table is intended mainly as a general comparison between connectors. Manufacturer current ratings are often specified for continuous use, while FPV drones can draw much higher currents for very short periods. In other words, a connector carrying a high current for a brief throttle burst is not the same as that connector carrying the same current continuously.
BetaFPV, for example, specifies a 9 A rated current for the BT2.0 connector, yet the discharge curve shown on the LAVA 2 1S battery page includes a 39 A test for the 680 mAh battery. In addition, a 680 mAh battery rated at 95C would theoretically correspond to a maximum discharge current of almost 65 A.
Which batteries for which drones?
The table below shows the most commonly used configurations. Depending on the specific drone model or its intended purpose, the manufacturer may use a different cell count, battery technology, or connector.
| Drone | Cell count | Technology | Most common connector |
|---|---|---|---|
| 65–75 mm tinywhoop | 1S | LiHV | BT2.0, A30 |
| Toothpick | 1S–2S | LiHV/LiPo | BT2.0, BT3.0, A30, XT30 |
| 3-inch freestyle | 4S, sometimes 6S | LiPo | XT30 |
| 5-inch freestyle | 4S-6S | LiPo | XT60 |
| 7-inch long range | 6S | Li-Ion, LiPo (less common) | XT60 |
| 10-inch long range | 6S-8S | Li-ion | XT60 / XT90 |
Battery charging
Charging phases
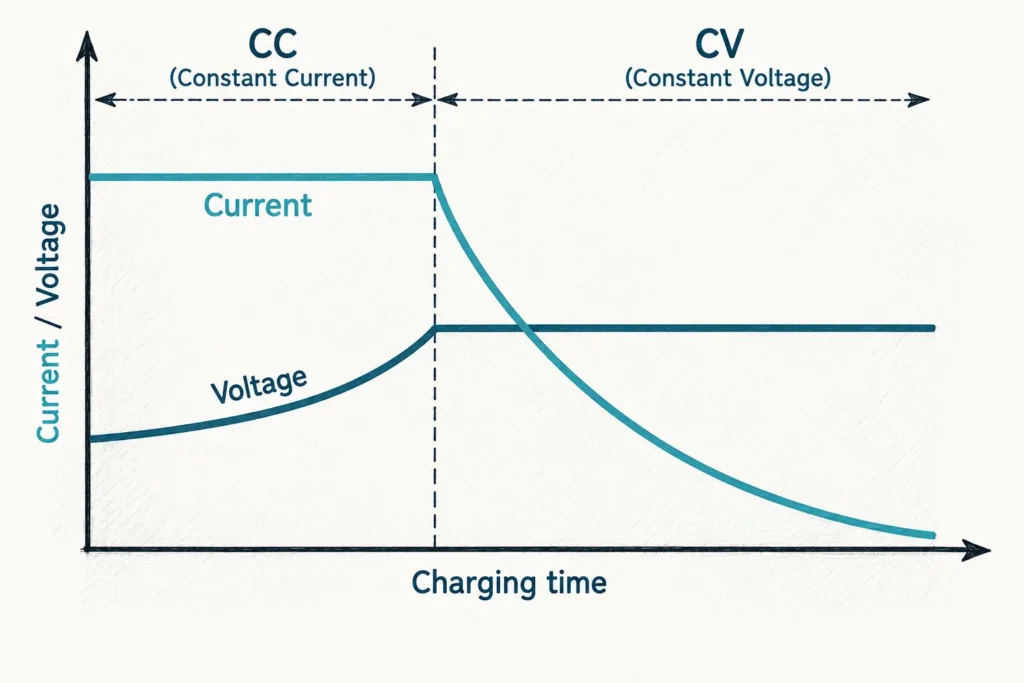
Modern FPV battery chargers typically charge lithium batteries using a CC/CV (Constant Current / Constant Voltage) algorithm. Simply put, charging takes place in two main stages.
Constant Current (CC)
During the first charging phase, the charger maintains a constant current. The battery is charged at the selected charging current (e.g., 1 A, 2 A, or 5 A), while its voltage gradually increases. This phase makes up most of the charging process and usually continues until one of the cells reaches its maximum allowed voltage — 4.20 V for LiPo and Li-ion or 4.35 V for LiHV.
Constant Voltage (CV)
Once at least one cell reaches its maximum voltage, the charger switches to the second phase — Constant Voltage (CV) mode. At this stage, the charger no longer allows the voltage to rise above the set limit. Instead, it gradually reduces the charging current until the battery is fully charged. This is why the last few percent of the charging process usually take longer.
Main battery charging modes
Balance charge
The charger not only charges the battery to the specified voltage, but also monitors the voltage of each individual cell through the balance connector. If one cell reaches a higher voltage than the others, the charger uses its balancing circuitry to bring the cells closer together. The goal is for all cells to finish charging at approximately the same voltage.
If you’re charging a multi-cell LiPo or LiHV battery and aren’t sure which charging mode to use, Balance Charge is generally the right choice. Just make sure that both the main power connector and the balance connector are connected as required by your charger.
Some chargers don’t have separate Charge and Balance Charge modes and instead provide a single charging mode. In that case, the charger may balance the cells automatically when the balance connector is connected. This depends on the charger, so it’s worth checking the manual.
When I bought my HOTA F6 charger, I was initially very surprised that I couldn’t find a Balance Charge mode. Only after going through the manual did I find a note explaining that everything was fine — you simply connect the balance connector, and the charger detects it and performs the balancing automatically.
Other possible mode names: Charge, Balance CHG
Storage
This is one of the most important charging modes, although beginners sometimes forget about it. In Storage mode, the charger automatically charges or discharges the battery toward its storage voltage. If you don’t plan to fly for the next few days, it’s generally better to leave your batteries at storage voltage rather than fully charged.
Other possible mode names: StoCHG, Storage Charging
Other battery charging modes
I’ll be honest — I’m not sure I’ve ever actually used any of these modes.
Charge
This is the simplest battery charging mode. The charger charges the battery to the selected maximum voltage, but depending on the charger, it may not actively balance the individual cells. On some chargers, cell balancing still takes place when the balance connector is connected, while on others, Charge and Balance Charge are separate modes.
Fast Charge
Fast Charge is intended to reduce charging time. Any charging at a rate higher than 1C is considered fast charging. Depending on the charger, it may end the charging process earlier or spend less time on the final balancing stage, allowing the battery to finish charging sooner.
Fast Charge can be useful when charging time matters more than achieving the most precise possible balance at the end of the charge (e.g. during races). For everyday charging, however, I’d generally stick with Balance Charge unless the charger’s manual recommends otherwise.
Discharge
In this mode, the charger discharges the battery to a selected voltage. It can be useful when you need to reduce the battery’s state of charge manually — for example, if your charger doesn’t have a dedicated Storage mode. The discharge power of many chargers is relatively low, so discharging a large battery this way can take quite a while. Not all chargers allow you to discharge a battery all the way down to 0 V
Destroy / Disposal
Some chargers also include a mode called Destroy, Disposal, or something similar. Unlike a normal Discharge mode, this function is specifically intended to reduce the battery voltage as far as the charger allows before disposal.
Whether a battery should be discharged before recycling depends on the guidance provided by the recycling facility or local battery collection program, so I wouldn’t treat this mode as a required step before disposal.
Battery chargers
There’s an especially wide range of battery chargers available, both for 1S batteries and for 2S and larger packs. Below, I’ve put together a fairly long list, but it still includes only some of the more popular models. It is definitely not a complete list.
1S battery chargers
| Model | Comment | URL |
|---|---|---|
| GEPRC WooPower W63 | Charges up to 6 batteries with BT2.0, A30, and PH2.0 connectors. | URL |
| VIFLY WhoopStor V3 | Charges up to 6 batteries with BT2.0, A30, and PH2.0 connectors. | URL |
| BetaFPV HexaCharger / PRO | Charges up to 6 batteries with BT2.0, A30, and PH2.0 connectors. | URL |
| BetaFPV 6 Ports 1S battery charger | Charges up to 6 batteries with BT2.0, A30, and PH2.0 connectors. It’s a slightly older model than the HexaCharger and doesn’t have a screen for monitoring the charging process — but it’s significantly cheaper. | URL |
| BetaFPV BT2.0 Battery Charger | Charges up to 2 batteries with BT2.0 connectors. It can also be used to quickly check battery voltage, which is very convenient when you’re out flying. | URL |
2S battery chargers
Chargers for higher cell counts
All of the chargers listed below have XT60 and balance connectors. If you want to charge a battery with a different main power connector, you’ll need an adapter — for example, XT30 ↔ XT60.
In addition, many of these chargers require an external DC power source, so you may also need a suitable power supply. Make sure the power supply can provide the voltage and power required by the charger. You might already have a suitable DC power supply lying around somewhere — but check its voltage and power rating before connecting it to the charger and you might need to do a little soldering to replace its connector with an XT60 or XT90.
Most of these chargers can also measure the internal resistance of batteries.
| Model | Comment | URL |
|---|---|---|
| 1 channel – charge 1 battery at a time | ||
| SkyRC B6neo series | Designed for charging 1S–6S batteries. It can be powered from a DC source through XT60 or USB-C. Thanks to its small size, it’s very convenient for field use when you need to charge or quickly check a battery. The B6neo line includes several models. There is also a model with built-in AC input — the B6ACneo. | URL |
| ISDT Q6 Nano | Designed for charging 1S–6S batteries. The Q8 and Q8 Max from the same series support up to 8S batteries and are also single-channel chargers. Like the SkyRC B6neo, the Q6 Nano is compact enough to be convenient for field use. It also includes a discharge function that can be used to discharge a battery for disposal. | URL |
| HOTA T8 | Designed for charging 1S–8S batteries. It is powered from an external DC source through XT60 and is one of the more affordable models in this list that supports 8S batteries. Like the SkyRC B6neo, its compact size makes it convenient for field use. The T8 Ultra adds built-in AC input. | URL |
| iSDT 608AC | Designed for charging 1S–6S batteries. It is similar to the ISDT 608PD but adds AC input. It also includes a discharge function that can be used when preparing a battery for disposal. | URL |
| ISDT P20 | Designed for charging 1S–8S batteries. It also includes a discharge function that can be used when preparing a battery for disposal. | URL |
| 2 and more channel chargers | ||
| HOTA D6 Pro | A dual-channel charger designed for 1S–6S batteries. It can be powered from either AC or DC, with XT60 used for DC input. It also includes wireless charging, which can be convenient for charging your phone. | URL |
| HOTA F6 | A four-channel charger designed for 1S–6S batteries. It requires an external DC power source through XT60. The F6 Ultra can be powered from either AC or DC and uses XT90 for DC input. | URL |
| SkyRC D200Neo | A dual-channel charger designed for 1S–6S batteries. It can be powered from either AC or DC, with XT60 used for DC input. It also has a USB-C PD output that can be used to charge a phone or other compatible USB-C devices. | URL |
| ToolkitRC Q6AC | A four-channel charger designed for 1S–6S batteries. It can be powered from either AC or DC, with XT90 used for DC input. It also includes wireless charging, which can be convenient for charging your phone. | URL |
Parallel charging — dangerous but useful
I originally considered skipping this topic altogether, but I’d be doing readers a disservice if I left it out. This is definitely not a beginner topic, for one fairly simple reason — the risks involved. A single careless mistake can very quickly lead to a serious fire.
Parallel charging requires careful preparation. The batteries need to use the same battery chemistry and have the same cell count. Their state of charge — and therefore their voltage — should also be very similar before they are connected. Some sources recommend keeping the difference between corresponding cells within 0.1 V. Charging should also be done in an appropriate fire-resistant area.
And one more thing — if one of the connected batteries is damaged or has severely unbalanced cells, very high equalization currents can flow between the batteries as soon as they are connected. In extreme cases, this can damage the batteries or even cause a fire.
It is precisely because of all these requirements — for the batteries themselves, their state of charge, and the charging environment — that parallel charging is not really a beginner topic.
Despite the risks, parallel charging can be a very efficient way to charge, for example, six batteries at the same time using a single charger channel. A parallel charging board can also be much cheaper than buying a charger with the same number of independent channels. And because all the batteries charge at the same time, you don’t have to keep swapping them around.
So what exactly makes it so dangerous? When batteries at different voltages are connected in parallel, current immediately begins flowing between them as their voltages equalize. If one 6S battery is at 25.2 V and another is at 22.5 V, the voltage difference between them is substantial, and the resulting equalization current can be enormous. The higher-voltage battery may be perfectly capable of delivering that current, but the lower-voltage battery may receive a charging current far beyond what it would normally be charged at. FPV batteries are commonly charged at around 1C.
Personally, I use a HOTA F6 four-channel charger, which is more than enough for my needs. Is it the most economical solution? Probably not. But simplicity and safety are more important to me. Four independent channels allow me to charge different batteries at the same time without having to worry about whether they are compatible with each other, so for me, that convenience is worth the higher price.
And now I’m going to contradict myself straight away — if I were racing and needed to charge a large number of batteries as quickly as possible, parallel charging would probably be much more appealing. Of course, first I’d actually have to buy a parallel charging board, which I don’t currently own.
Battery storage
If you asked FPV pilots who have been in the hobby for at least a few years what shortens battery lifespan the most, many of them probably wouldn’t say “flying too aggressively.” Instead, they’d point to improper battery storage.
Lithium batteries don’t like extremes. They don’t like being stored either fully charged or deeply discharged. If you know you won’t be flying for the next few days, it’s generally better to leave your batteries at storage voltage — around 3.8–3.85 V per cell for a typical LiPo battery.
Why shouldn’t you store fully charged batteries for long periods?
At a high state of charge, lithium cells are under greater chemical stress. Over time, this accelerates aging: internal resistance can increase, usable capacity can decrease, and the battery can gradually lose some of its ability to deliver high current.
If you fully charge a battery in the evening and go flying the next day, there’s generally no reason to worry. The problem arises when batteries sit at 100% charge for weeks or months.
Fun fact: many DJI camera drone batteries have built-in Battery Management Systems (BMS) that can automatically discharge the battery to a lower storage level after it has been left fully charged for a certain period of time.
Why shouldn’t you store fully discharged batteries?
The other extreme is storing a battery at a very low state of charge. Even when it isn’t being used, a battery gradually loses some charge through self-discharge. If its cells are already close to their minimum safe voltage, continued self-discharge can eventually push them below that level.
If the voltage drops too low, the cells can suffer irreversible damage. The battery may lose capacity, its internal resistance may increase, and in some cases it may become unusable.
Storage voltage — the best compromise
For a typical LiPo battery, around 3.8 V per cell is commonly used as a storage voltage. Storing the battery around this level reduces the stress associated with keeping it fully charged while also leaving a comfortable margin above the deeply discharged range.
That’s exactly why most modern FPV battery chargers include a Storage mode that can charge or discharge the battery toward its storage voltage. If you don’t plan to fly for the next few days, using this mode is one of the simplest ways to help preserve battery lifespan.
By the way, if you’ve finished flying and, after a few minutes, once the battery voltage has stabilized, you see that it is around 3.8–3.85 V per cell, then the battery is already practically at storage voltage and there’s no need to do anything else.
P.S. In the list of battery chargers above, I tried to check each model to make sure it has a Storage mode. Some models didn’t make the list for this particular reason, including the iSDT 608PD and iSDT P10.
Heat — the biggest enemy of batteries
If high voltage accelerates battery aging, high temperatures can accelerate it even further. One particularly bad combination is leaving fully charged batteries in a hot car during the summer. The temperature inside a car parked in direct sunlight can become extremely high (120-160ºF/50–70°C), creating especially harsh conditions for lithium batteries.
That’s why it’s good practice not to leave batteries in the car any longer than necessary and to move them to a cooler place after flying.
How to store batteries safely?
Although modern LiPo and Li-ion batteries are generally quite safe when handled properly, damaged or improperly used lithium batteries can catch fire. Such incidents aren’t common, but the consequences can be serious. For this reason, it’s worth following a few simple storage rules.
- As I’ve already mentioned several times, I’ll repeat it once again — first of all, store your batteries at the appropriate storage voltage. For a typical LiPo battery, that’s around 3.8–3.85 V per cell. This helps preserve battery lifespan and avoids keeping the cells unnecessarily close to either voltage extreme.
- The storage location should be dry, cool, and protected from direct sunlight. Avoid leaving batteries in a car, on a windowsill, or in other places where the temperature can rise significantly;
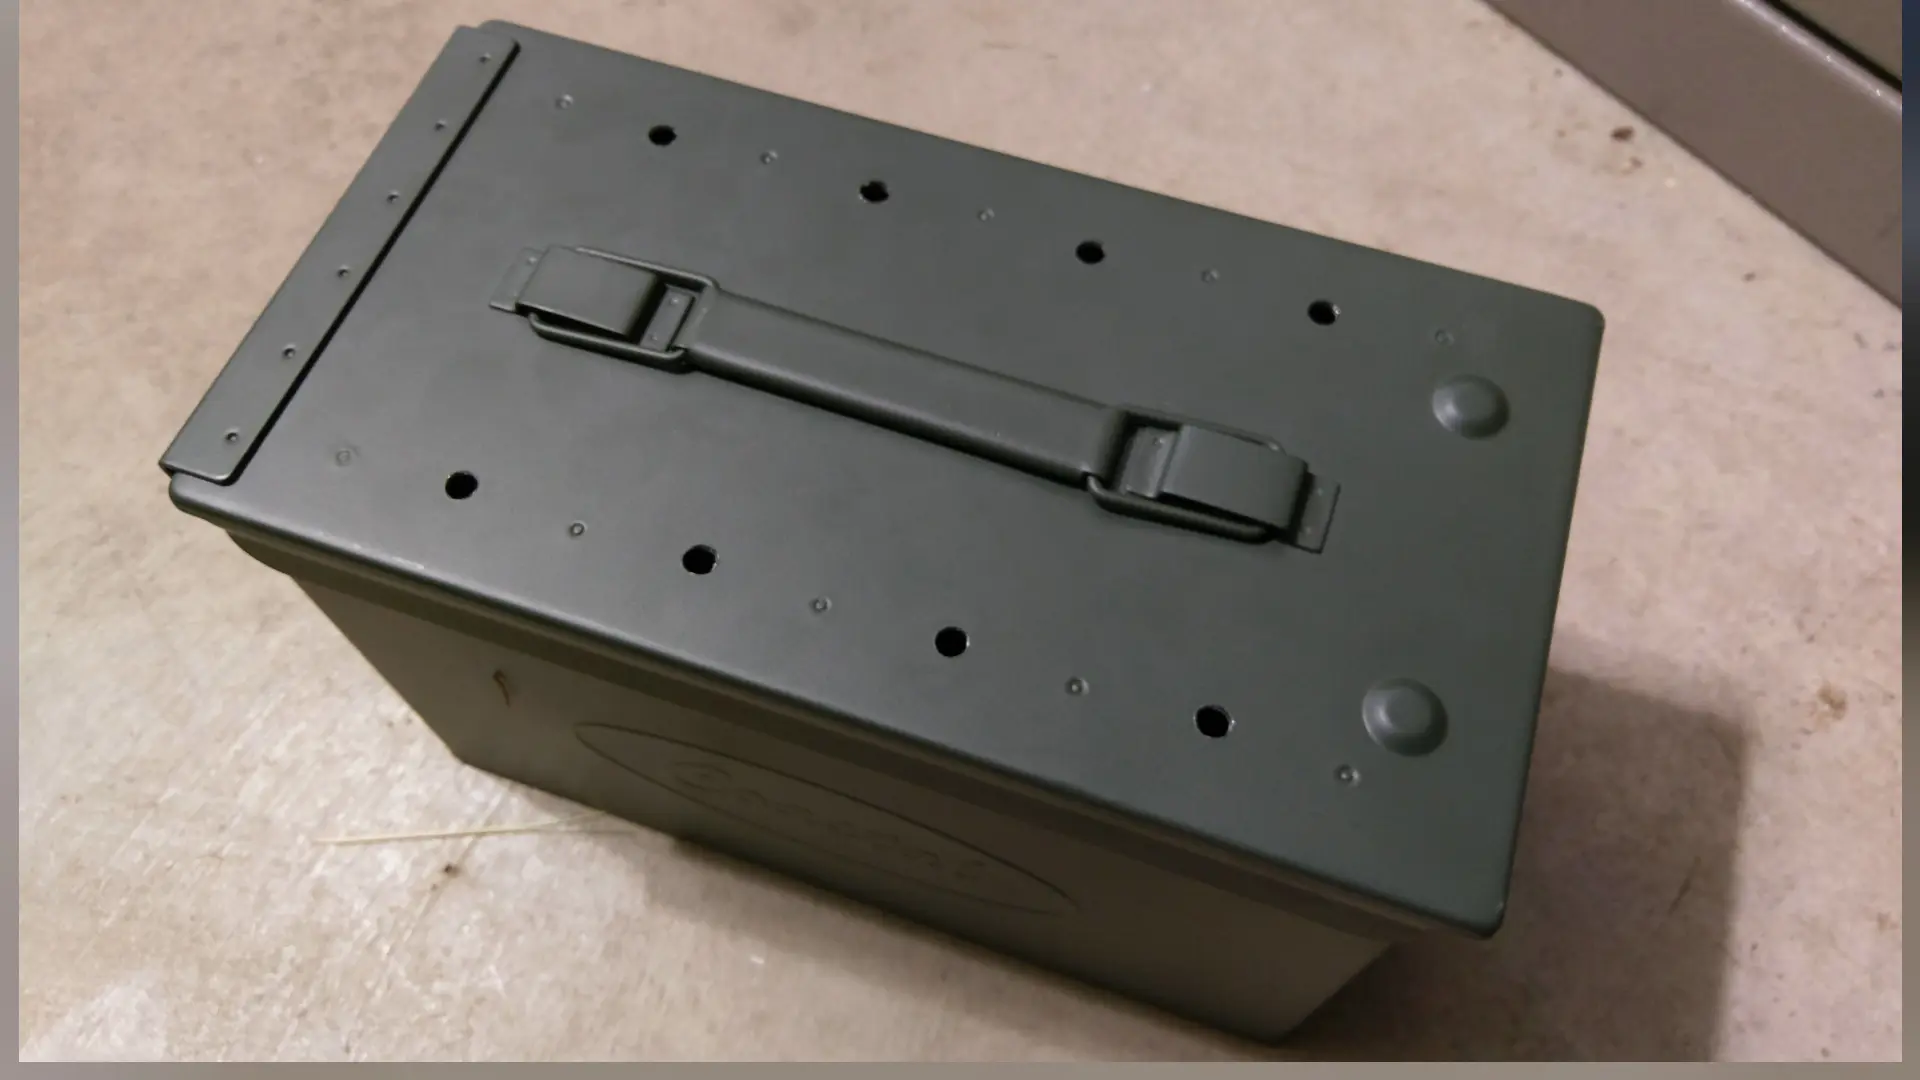
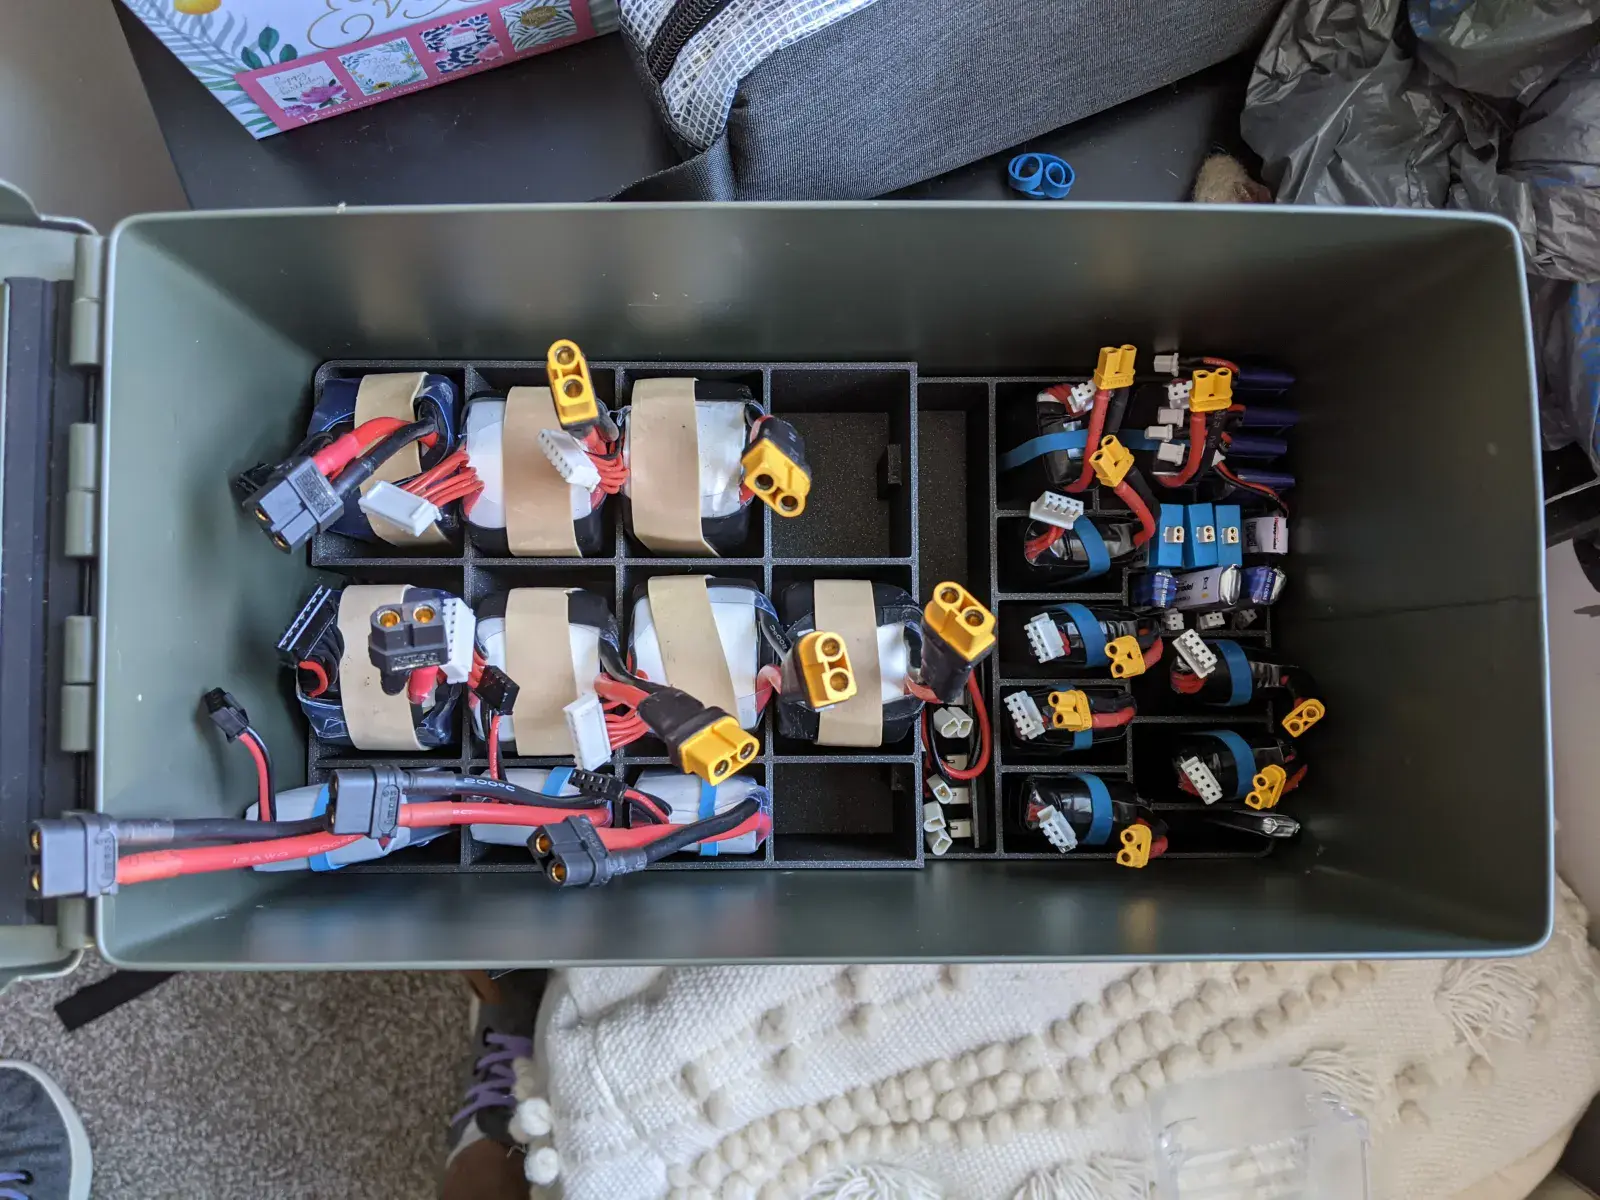
- If you have several batteries, it’s worth considering a container intended for lithium battery storage. Dedicated LiPo bags are a common option, while some pilots use metal or purpose-built LiPo storage boxes. Whatever you use, avoid assuming that a storage container makes a damaged battery completely safe. Just make sure the batteries aren’t stored in a completely airtight container — in the event of a fire, the gases produced need a way to escape, otherwise the pressure can rise to dangerous levels. I’ve noticed that some fellow pilots use metal ammunition boxes for this purpose, drilling a few ventilation holes in them before storing their batteries inside.

- Before every flight, it’s worth giving the battery a quick inspection. If it is severely swollen, punctured, physically damaged, has broken wires, or has damaged insulation, don’t use it for another flight. A battery failure in the air can mean losing the drone — and a damaged lithium battery can also become a fire hazard.
- Store batteries so that their connectors cannot accidentally come into contact with conductive objects. A short circuit can cause an extremely high current and rapidly heat the battery. Even something as simple as securing the battery leads against the pack can help keep the connectors from moving around inside a storage bag or box.
- Quite recently, I also came across rubber caps for XT30 and XT60 connectors. These provide an additional layer of protection for the connectors.
Voltage sag
If you monitor the battery voltage shown on the OSD during flight — and you really should — you’ve probably noticed that when you suddenly increase the throttle, the voltage drops, and when you reduce the throttle, it rises again. This phenomenon is known as voltage sag.
It happens because the battery has to deliver much more current under heavy load. Because every cell has internal resistance, the voltage measured at the battery terminals drops as current increases. As a result, the battery voltage under load can be noticeably lower than its resting voltage.
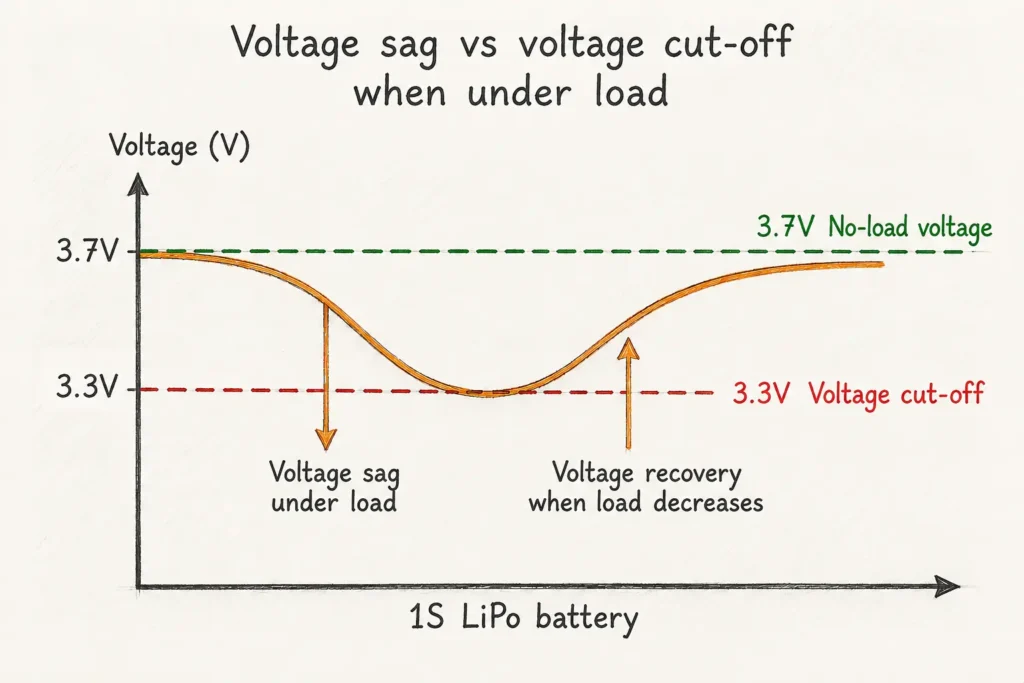
A small amount of voltage sag is completely normal. However, unusually large voltage sag can indicate that the battery is aging and its internal resistance has increased, or that the battery simply cannot deliver the current your drone demands without a substantial voltage drop.
If the voltage drops far enough, the drone’s electronics may experience a brownout or reset. In the worst case, that can mean temporarily losing control, video, or both — which is obviously a serious problem if you’re close to the ground.
This is why you shouldn’t judge the state of your battery during flight based solely on the voltage you see during a hard throttle pull. Also pay attention to the voltage the battery recovers to once the load is reduced. A healthy battery will generally show less voltage sag than a worn battery of the same type under a similar load.
Internal resistance — IR
Each battery cell has a certain amount of internal resistance (IR). A new, healthy battery will usually have relatively low IR, while internal resistance tends to increase as the battery ages. This makes IR a useful indicator when tracking battery condition over time. Higher internal resistance causes a larger voltage drop under load, more heat generation inside the battery, and less voltage available to the rest of the power system.
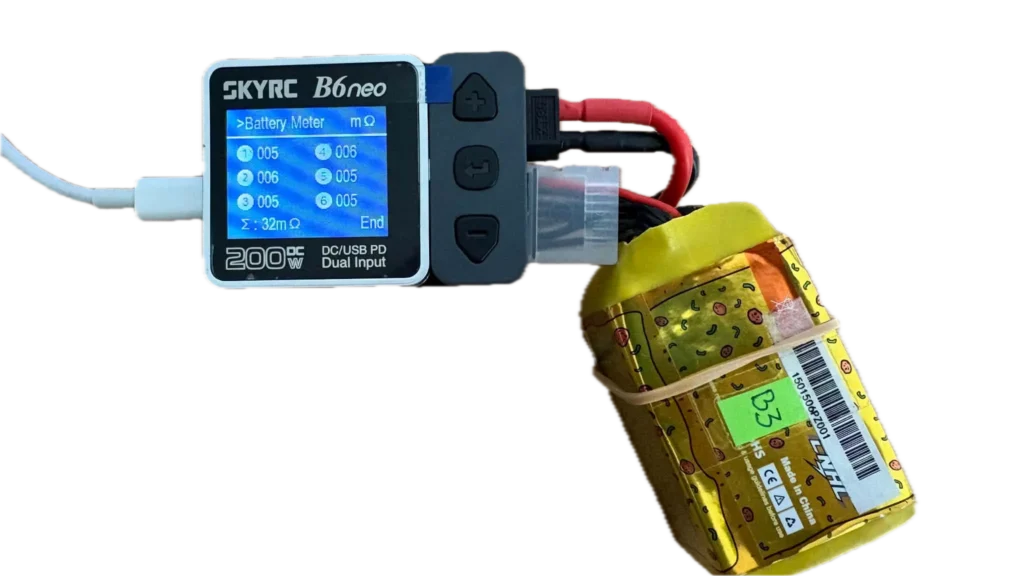
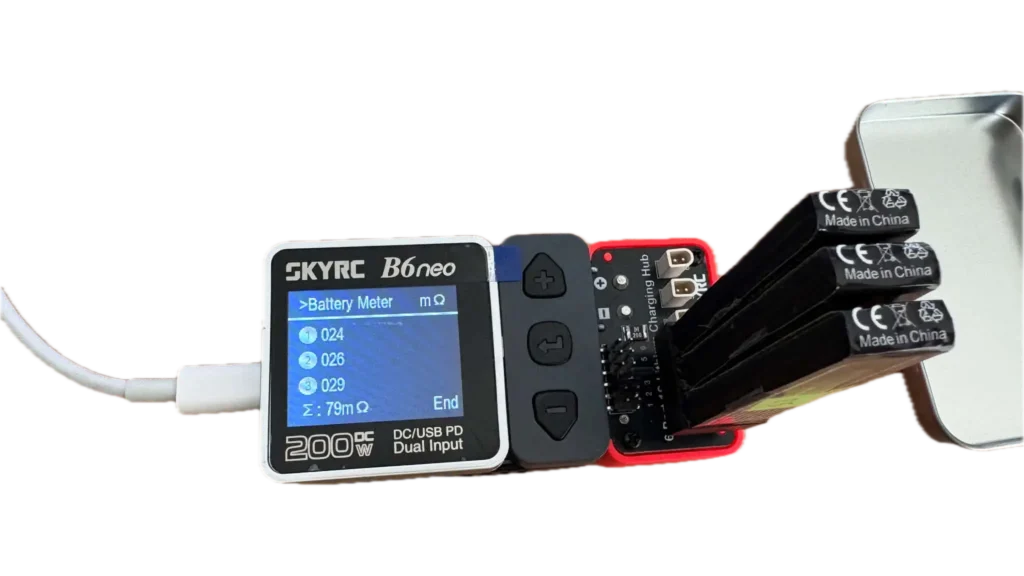
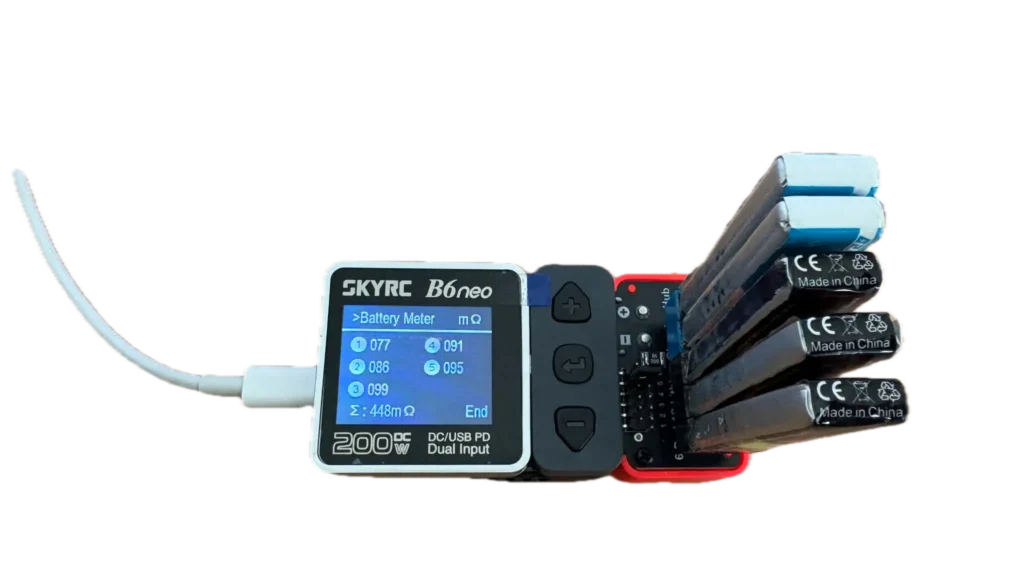
Many FPV battery chargers can measure internal resistance. They display the IR value of each cell separately, allowing you to monitor not only the overall aging of the battery but also to notice if one cell starts deteriorating faster than the others.
It’s important to understand that the absolute IR value is often less useful than how it changes over time. Measurements can vary depending on the charger, battery temperature, state of charge, and other conditions. For that reason, if you want to track battery health using IR, try to measure it under similar conditions and with the same charger each time.
A simple battery log can be useful here, where you can regularly record the IR of each battery you own.
If you notice that a battery’s internal resistance has increased substantially over time and it also shows significantly more voltage sag during flight, that’s a strong sign that its performance has deteriorated.
By the way, don’t compare IR numbers from completely different batteries too literally. Cell size, chemistry, capacity, temperature, state of charge, age, and measurement method can all affect the reading. The most useful comparison is usually the same battery measured over time, or similar cells measured under similar conditions.
Battery lifespan
How long does an FPV drone battery last? There is no single answer. Some batteries are simply better built than others, and how they are used and stored matters enormously. One battery may lose a noticeable amount of performance relatively quickly, while another may remain perfectly usable for hundreds of cycles.
Battery lifespan is often described in charge–discharge cycles. Roughly speaking, one full cycle represents using an amount of energy equivalent to the battery’s full usable capacity and then recharging it. Partial discharges therefore don’t necessarily count as full cycles on their own. For example, two roughly half-depth discharge-and-recharge cycles would add up to approximately one full equivalent cycle.
Every charge–discharge cycle contributes some wear, but battery lifespan also depends heavily on how the battery is treated. If your goal were to wear out a LiPo battery as quickly as possible, this would be a pretty good recipe:
- frequently discharge it to a very low voltage — around the “practically empty” level from the table above or even lower;
- leave it fully charged for long periods;
- leave it in a hot environment, such as inside a car during the summer or on a sunny windowsill;
- regularly charge it at unnecessarily high charge rates.
Manufacturers sometimes state that a battery can withstand 300, 500, or even more cycles. These numbers are achieved under laboratory conditions — batteries are charged at relatively low rates, below 1C, discharged under less demanding loads, kept at ideal temperatures, and not left fully charged for long periods.
FPV reality can be quite different. In freestyle and racing drones, batteries are routinely subjected to high current loads, and they can heat up considerably during demanding flights. Their voltage also drops under load because of voltage sag. Combined with deep discharges, high temperatures, aggressive charging, and poor storage habits, this can accelerate cell aging.
In practice, you can use the following numbers as a rough guideline:
- around 100 cycles can be considered a quite good result for an intensively used LiPo battery;
- achieving 200–300 cycles is entirely realistic with proper battery care—specifically, by keeping them in a long-term storage state, avoiding prolonged periods at a voltage of 4.2 V per cell, and preventing frequent voltage drops below 3.5 V per cell during flight.
By the way, it’s worth knowing that LiPo batteries generally last longer than LiHV batteries, while Li-ion batteries generally last longer than LiPo batteries.
How much do batteries cost?
When you first get into the FPV hobby, it may not be the cost of the drone itself or its parts that surprises you most — it may be the price of the batteries. When I bought my first drone, I bought only one battery. Since a single flight usually lasts just a few minutes, my first few trips to the flying spot ended pretty quickly. It didn’t take long before I bought a few more batteries so I could get several flights in before heading home.
Depending on the type of drone, a single battery can cost anywhere from a few dollars to $70 or more. Once you own several drones and enough batteries for multiple flights, it’s surprisingly easy to end up with several hundred dollars invested in batteries alone.
| Battery | Indicative price |
|---|---|
| 1S tinywhoop | $5–10 |
| 2S tinywhoop | $10–20 |
| 4S freestyle | $20–35 |
| 6S freestyle | $25–45 |
| 6S Li-ion long range | $35–70 |
How many batteries should you have?
There’s no single correct answer here either. Personally, I like to have enough batteries that I don’t have to spend a flying session constantly waiting for them to charge. I’ve also built a few Li-ion battery packs that I use to recharge batteries at the flying spot, but since I usually charge at 1C or less, it still takes a while.
As a rough starting point:
- tinywhoop: 6–12 batteries;
- freestyle: 3–8 batteries;
- long range: 2–4 batteries.
Of course, it all depends on how long you plan to spend at the flying spot and whether you have a way to charge your batteries there.
Although, if your wallet is bottomless — go wild. You can never have too many batteries… until you have to charge and store all of them. Just don’t forget how to store them safely.
Is it worth buying the cheapest batteries?
It may seem like a cheaper battery is always the better choice, but in practice, the opposite is often true.
Higher-quality batteries generally:
- maintain their voltage better under heavy load;
- generate less heat;
- lose their performance more slowly over time.
That’s why a more expensive battery will usually provide a better flying experience and last longer.
Battery manufacturers and models I’d consider
Of course, everyone has their own preferences here. These are some of the manufacturers and battery lines I would personally consider when shopping for FPV batteries:
- Tattu R-Line (premium)
- CNHL – Speedypizza Pro (premium)
- BetaFPV Lava series
- GNB
- Flywoo
- NewBeeDrone
- Dogcom (budget)
- CNHL – Speedypizza (budget)
- CNHL – Black (budget)
When is it time to say goodbye to a battery?
Sooner or later, every battery reaches the point where it no longer performs the way you need it to — or becomes unsafe to keep using. There isn’t necessarily a specific age or cycle count at which that happens. What matters much more is the battery’s actual condition.
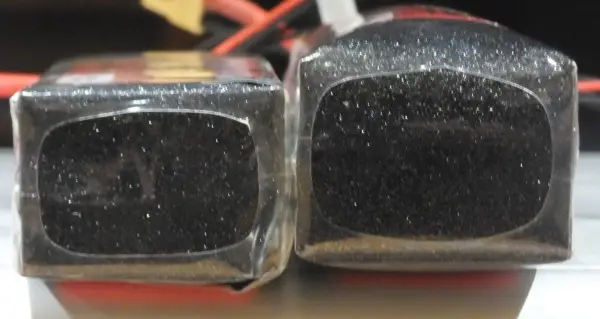
Swelling
This is one of the clearest warning signs. If a battery has visibly swollen, it means that unwanted chemical processes are taking place inside it. You should stop using such a battery as soon as possible. Slight swelling doesn’t necessarily mean that the battery is about to catch fire, but it is a clear sign that its useful life is approaching the end.
And whatever you do, never try to puncture the wrapping and “deflate” the battery.
Voltage sag
This is something you’ll notice during flight. If a fully charged battery shows much more voltage sag than it used to under a similar load — especially right at the beginning of the flight — that can be a sign that it is no longer able to deliver current as effectively as before.
Increasing voltage sag is therefore one of the useful signs that a battery’s performance is deteriorating.
Internal resistance
This is closely related to the previous point about voltage sag. As internal resistance increases, more voltage is lost under load and more energy is converted into heat inside the battery. If the IR of the same battery keeps increasing over time, especially when measured under similar conditions, that’s another sign that the battery is aging.
Chances are, you’ll notice the change even without measuring internal resistance — the drone may feel noticeably less responsive, especially during hard throttle pulls, and the battery may no longer deliver the performance it once did.
Cell balance
If one cell consistently ends up at a noticeably different voltage from the others, or the charger takes increasingly longer to balance the pack, this may indicate that one of the cells is deteriorating faster than the rest.
Reduced capacity
If the same battery used to give you around five minutes of flight time but now barely manages two or three minutes under similar flying conditions, it has probably lost a significant amount of usable capacity.
By the way…
By the way, an old battery isn’t automatically a useless battery. A pack that has lost some capacity or can no longer handle the current demands of aggressive flying may still be useful for a less demanding application. For example, a battery that is no longer suitable for racing might still work perfectly well for powering FPV goggles — provided that the battery itself is still physically safe to use.
Battery disposal
Lithium batteries should never be placed in regular household trash. Even an old or unusable battery may still contain enough stored energy to create a fire risk if it is short-circuited, crushed, or otherwise damaged. Used batteries should be taken to an appropriate battery or electronics recycling collection point. It is recommended to fully discharge it, before doing so.
You may still come across old advice online suggesting that LiPo batteries should be discharged by placing them in salt water. I wouldn’t recommend following that method. Use the disposal instructions provided by your local battery recycling program instead.
Disposal requirements can vary by country and by recycling program. When I originally researched this topic in Lithuania, I contacted a company responsible for electronic waste collection and asked how old lithium batteries should be prepared for recycling. Their general advice was:
Before taking the battery to a recycling collection point, they recommend:
- covering its contacts with electrical tape to prevent a short circuit during transport;
- packing each battery separately so that it cannot come into contact with other batteries or metal objects;
- not disassembling, puncturing, crushing, or otherwise damaging the battery.
TL;DR — the minimum you should remember
In short:
- Charge batteries only up to the maximum voltage specified for their chemistry. The simplest way to do this is to select the correct battery type on your charger — LiPo, LiHV, or Li-ion.
- Use a charging rate supported by the battery. When in doubt, 1C is a common conservative starting point.
- Don’t leave batteries fully charged for long periods. If your flying plans change, use your charger’s Storage mode to bring them toward the appropriate storage voltage.
- Avoid deeply discharging batteries during flight.
- Store batteries in a cool, dry place away from direct sunlight and excessive heat.
- Consider using a container intended for lithium battery storage.
- Regularly inspect batteries for swelling, damaged insulation, broken wires, punctures, or other physical damage.
The biggest and most common mistakes
- Leaving batteries fully charged for long periods.
- Regularly discharging batteries too deeply.
- Charging batteries without using Balance Charge mode.
- Continuing to use physically damaged batteries.
- Choosing batteries based only on price or the advertised C rating.
- Ignoring a consistent increase in internal resistance.
- Leaving batteries in a hot car or another high-temperature environment.
- Mixing up LiPo and LiHV charging modes.
- Storing batteries carelessly where they can be damaged, overheated, or short-circuited.
What do I use?
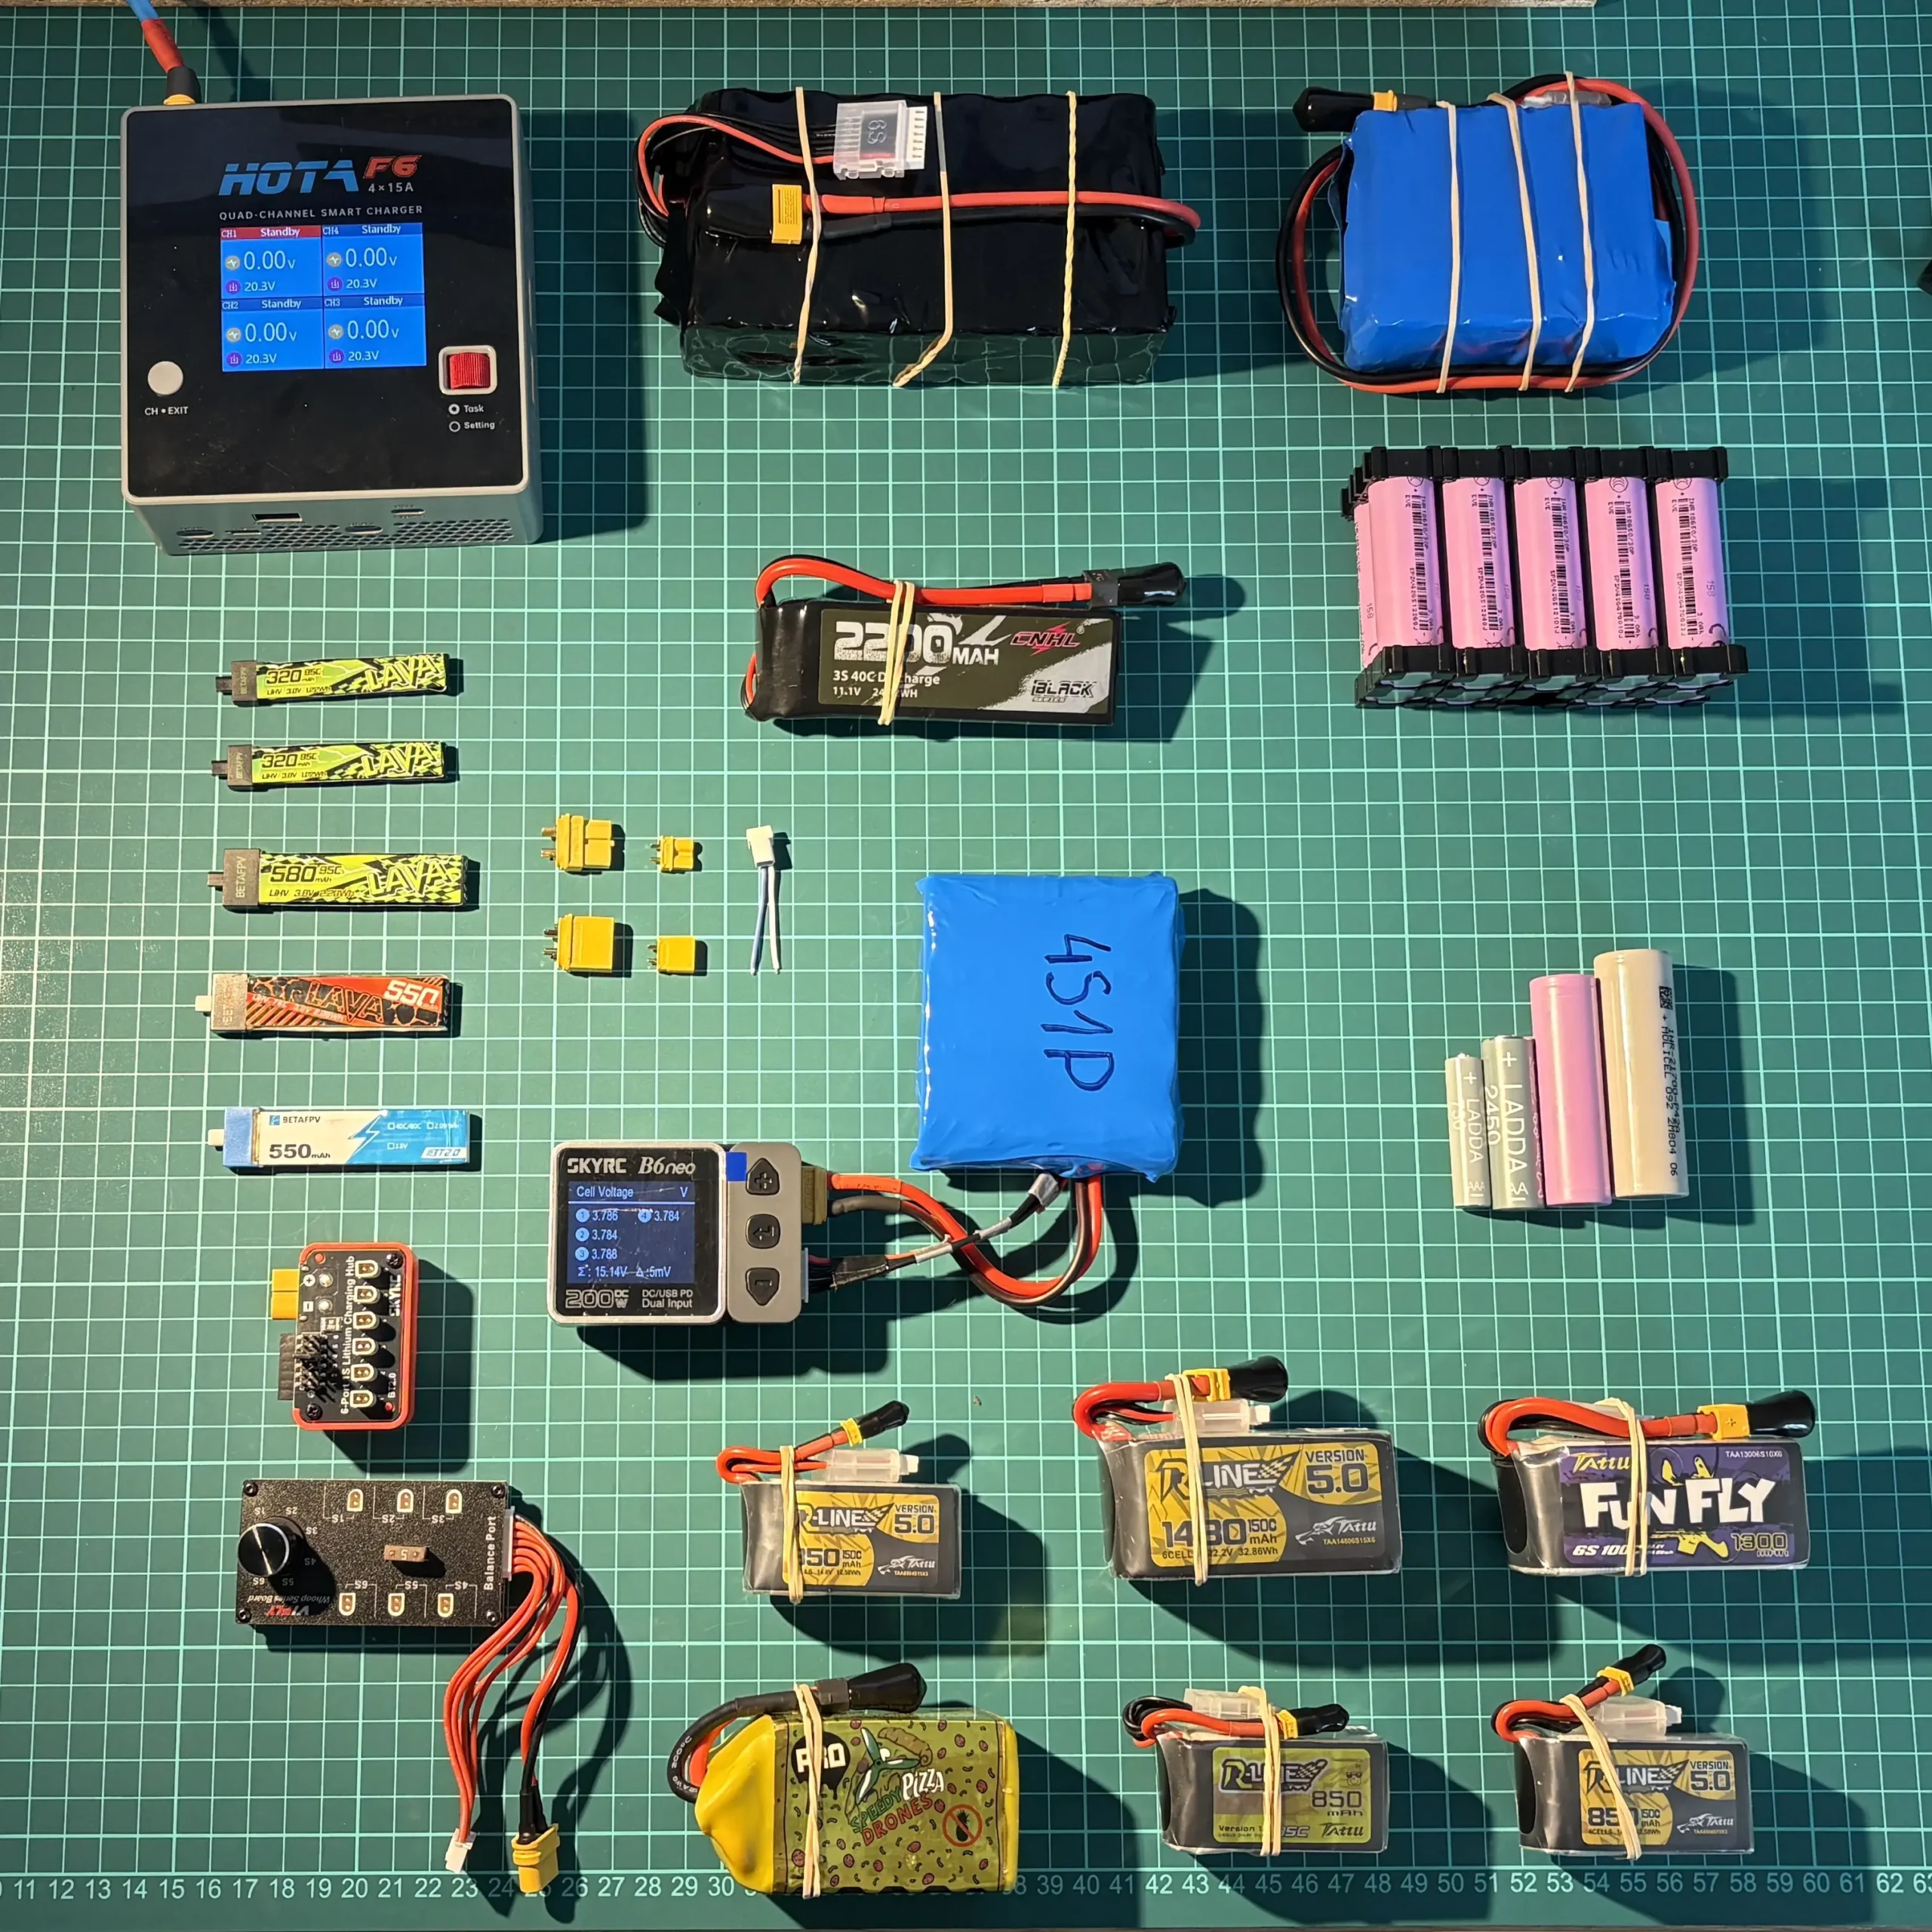
After writing all of that, I should probably finish by showing you what I personally use on a daily basis.
Battery chargers
| BetaFPV BT2.0 Battery Charger |
| My first charger was the 1S battery charger that came with my BetaFPV Meteor75 Pro tinywhoop. Right from the start, I knew I probably wouldn’t use it much as a charger because it only has two channels and doesn’t let me bring batteries to storage voltage. But I still use it to this day as a quick battery voltage checker. |
| Vifly Whoopstor 3 |
| This charger was ordered just a few days after the first one. Charging only two batteries at a time? No, no, no. A long wait for the batteries to charge, just a few minutes of flying — and then you start all over again. The WhoopStor has six channels and allows you to charge six batteries at the same time. Since I sometimes feel like flying around the house as well, this is the 1S charger I use the most. Would I replace it with something else? Not anytime soon. However, if I were buying my first 1S battery charger today, I’d probably choose the GEPRC WooPower W63. Why? Because it allows you to configure the charging parameters for each channel independently. Sometimes, after flying my smallest BetaFPV Air65, I already want to prepare its batteries for long-term storage while at the same time charging the larger batteries for my BetaFPV Meteor75 Pro. But that’s definitely not a dealbreaker that would make me buy another charger (especially since I have other “accessories” for charging 1S batteries — see below). |
| SkyRC B6Neo |
| This was my first charger for larger batteries. It’s extremely small and portable, and it can check battery voltage and measure internal resistance — pretty much everything I needed when I was starting out. Most importantly for my setup, it can be powered through USB-C PD as well as its other DC inputs, so I didn’t need to change anything on my workbench. Everything I needed was already there. Over time, having only one charging channel became a bit limiting. I don’t own that many batteries, but I charge them both at home and at flying spots, so being able to charge only one pack at a time isn’t always ideal. Would I replace this charger with something else? Definitely not. I used it every day back then, and I still use it every day now. And with a few additional accessories, it’s even more useful than it was in the beginning. |
| HOTA F6 |
| This is my current workhorse. It has four channels, each configurable independently. Admittedly, it may not be the right choice for everyone because the standard F6 requires an external DC power supply. In my case, I already had a suitable 135 W power supply, so powering the charger wasn’t a problem. For those who prefer built-in AC power, there’s also the F6 Ultra. It also has USB-C and USB-A outputs for charging or powering other devices. I don’t use them very often because I already have several dedicated charging cables on my desk. By the way, quite recently, during a storm in the countryside, the power went out and I actually got to use this feature. I powered the charger from a Li-ion battery pack I had with me and used its USB output to charge my phone. A pretty niche use case, but at least I got to do a little more facebook scrolling before going to sleep. |
| SkyRC OSH |
| When I saw the OSH 6-Port 1S Lithium Battery Charging Hub, I bought it without hesitation. For around $10, the ability to turn my B6neo into a charger for six 1S BT2.0 batteries seemed very, very appealing. And indeed — it has made my life much easier. The WhoopStor’s limitation of not being able to use different charging modes on different channels is effectively solved: one mode on the WhoopStor, another on the OSH connected to the B6neo. However, this little gadget does have one downside. It isn’t causing me any problems yet, but I’m pretty sure it will eventually. To tell the charger how many batteries are connected — it effectively sees them as the individual cells of one larger pack — you have to move a tiny jumper. It’s very small and completely exposed, so I suspect I’ll eventually have to find a replacement for it. Not only does it look fragile, but it also doesn’t stay in place particularly securely. The B6neo goes everywhere with me because I can simply grab it and throw it into practically any pocket of my backpack. This little accessory, however, is something I can’t just toss anywhere quite as confidently — specifically because of that tiny jumper. |
| VIFLY 1S Series Charging Board |
| This is the newest charging accessory in my collection. I came across it quite unexpectedly after spotting one by chance on Vinted. Like the SkyRC OSH, it connects to the XT60 and balance ports of a charger designed for larger batteries. I’d like to put it into some kind of 3D-printed case, but that would really just be a small improvement to something that’s already good as it is. Unlike the OSH, it doesn’t use a tiny jumper. Instead, it has a convenient rotary knob that stays firmly in place. Together with my other chargers, this accessory has increased the number of BT2.0 batteries I can charge at the same time to 18. That’s significantly more than I currently need. If I had to choose between this and the SkyRC OSH, I’d choose this one. Although it’s more expensive than the OSH, it’s still cheaper than the WhoopStor. |
Batteries
A real zoo here.
| 1S LiHv batteries (BT2.0) |
| • BetaFPV LAVA 2 580 mAh 95C — my main batteries for the Meteor75 Pro tinywhoop. They’re my main batteries simply because they’re the newest ones I own. Compared with my previous LAVA batteries, they maintain their performance better under load, and I’m getting almost a minute more flight time from them. • BetaFPV LAVA 550 mAh 75C — these were my main batteries last year. Compared with the standard BetaFPV batteries I used before them, I was getting at least a minute of additional flight time. • BetaFPV 550 mAh 40C — the first standard 1S batteries that came with my Meteor75 Pro drone. I’ll be disposing of them in the near future. • BetaFPV LAVA 2 320 mAh 95C — my main batteries for flying the Air65. • BetaFPV LAVA 260 mAh 80C — these are still fairly new, so I’m also using them regularly with the Air65. |
| 3S Lipo batteries (XT60) |
| CNHL Black series 2200 mAh 40C — this is my main battery for powering various equipment, most often my FPV goggles. Sometimes I also use it to power a SpeedyBee adapter so I can configure a drone in the field without a computer. I haven’t actually tried using this battery on a drone yet. I originally bought it to power a spot welder for building battery packs. |
| 4S LiPo batteries (XT30) |
| Tattu R-Line V1 850 mAh 95C and Tattu R-Line V5 850 mAh 150C — both have worked very well for my cinewhoop. Although the V5 isn’t the latest generation anymore, both batteries provide more than enough performance and capacity for the way I fly. I typically get around 7–8 minutes of flight time. |
| 6S LiPo batteries (XT60) |
| • Tatttu R-Line V5 1480 mAh 150C • Tattu FunFly 1300 mAh 100C • CNHL Speedy Pizza PRO 1500 mAh 150C I haven’t noticed much of a difference between these batteries. But to be fair, with my 5-inch freestyle drone, I don’t push them anywhere near their limits. |
| 4S/6S Li-Ion battery cell packs |
| • 6S2P (8000 mAh, 10C) — built from BAK N21700CGP 21700 4000 mAh cells. I built this pack myself mainly for charging other batteries while traveling. During a trip to Croatia, I used it to charge my camera drone batteries on the road. I also use it when testing newly built 6S drones on the workbench, and I’m currently using it for test flights with my 10-inch drone. My next battery-related project will probably be either another DIY pack built from higher-discharge tabless cells or a factory-made 6S2P or 6S4P pack. • 4S2P (5000 mAh, 8C) — built from Samsung 25R 18650 2500 mAh cells. This is another portable power pack. Sometimes I use it to power my FPV goggles, and sometimes I use it to charge 1S batteries at the flying spot. • 2S1P (3000 mAh, 10C) — built from EVE INR18650-30P 18650 3000 mAh cells. This is my most recent battery pack. I built it to replace the 4S2P pack I had previously been using to power my FPV goggles. I took some photos along the way, so I’m hoping to write a short post showing how to build a simple battery pack like this. More importantly, I made a few basic mistakes while building it, so I definitely want to share those too 🙂 |
Sources
- https://www.evlithium.com/Blog/18650-battery-voltage-guide.html
- https://www.ersaelectronics.com/blog/18650-battery-voltage-a-complete-guide
- https://trydantech.com/newsroom/what-are-tabless-battery-cells-a-technical-deep-dive
- https://oscarliang.com/gnb-6s-lihv-lipo-batteries/
- https://www.molicel.com/wp-content/uploads/INR21700P45B_1.2_Product-Data-Sheet-of-INR-21700-P45B-80109.pdf
- https://genstattu.com/bw/
- https://chinahobbyline.com/blogs/news/the-best-way-to-charge-and-storage-your-lihv-battery
- https://www.grepow.com/blog/lipo-battery-vs-lihv-battery-what-is-the-difference.html
- https://www.grepow.com/blog/what-is-the-voltage-of-a-lipo-battery.html
- https://www.batteryuniversity.com/article/bu-303-confusion-with-voltages/
- https://www.batteryuniversity.com/article/bu-409-charging-lithium-ion/
- https://4-max.co.uk/pdf/HOTA/HOTA-F6-User%20Manual.pdf
- https://news.samsungsdi.com/global/articleView?seq=322
- https://www.battery-germany.de/wp-content/uploads/2021/02/LF50K3.2V-50Ah-Product-SpecificationVersion-D.pdf
- https://www.instagram.com/p/C8cskA8tj2q/?img_index=4&igsh=MWp2NWx2OGNmY2Zmdw%3D%3D
- https://blog.skyrc.com/using-the-cc-cv-method-to-charge-lipo-batteries/
- https://oscarliang.com/parallel-charging-multiple-lipo/
- https://www.youtube.com/watch?v=lZKoW_ekAu0
Leave a Reply