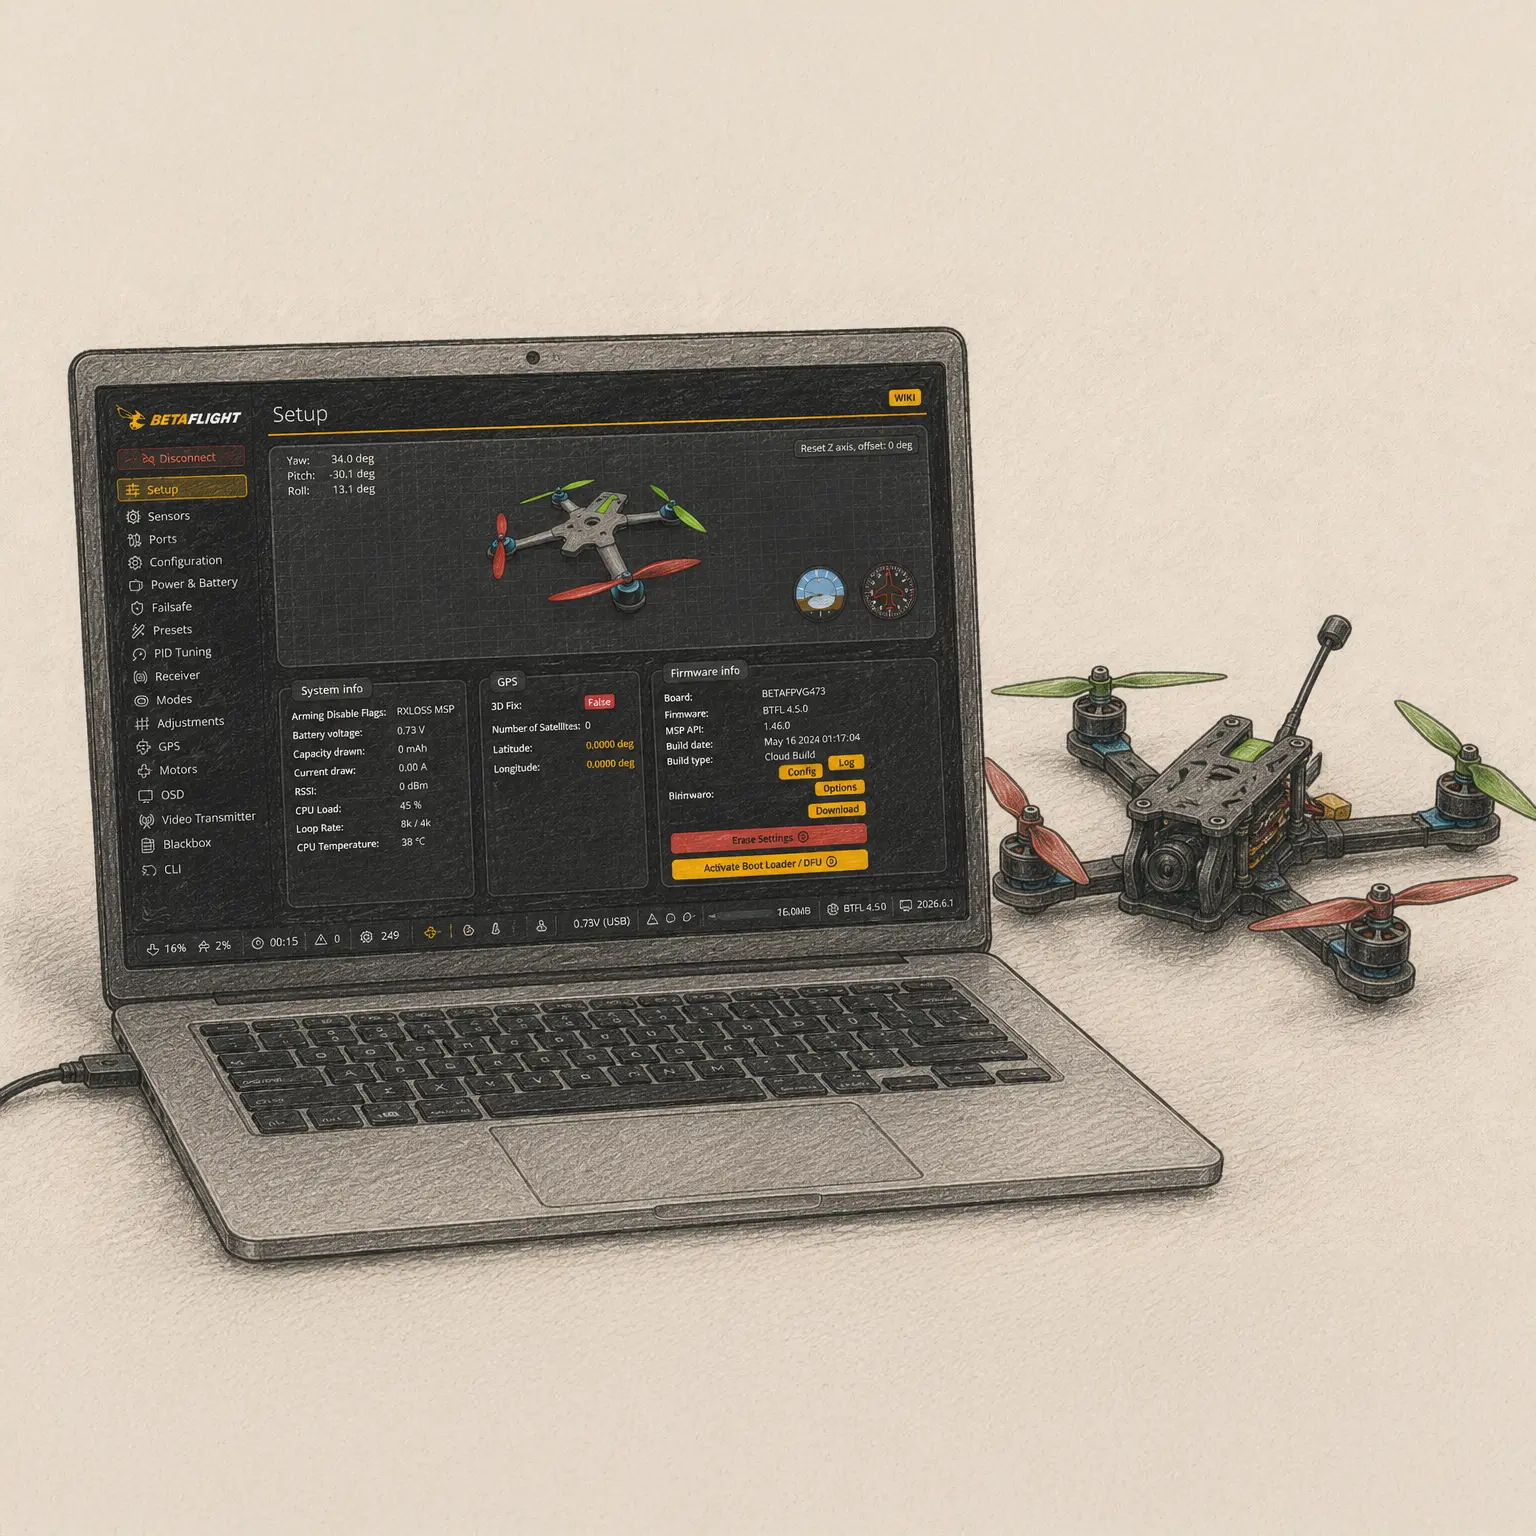
A new FPV drone isn’t necessarily ready to fly straight out of the box. Even a factory-built BNF drone can have an incorrect channel map, motor order or direction, ARM switch assignment, or another configuration issue that could bring your first flight to an end before it has even properly begun.
In this Betaflight setup guide, we’ll go through the most important checks before your first flight, step by step — from FC orientation and receiver channels to motors, failsafe, VTX, and OSD. The goal is simple: don’t reconfigure anything unnecessarily; just make sure the drone is actually ready to fly safely.
Disclaimer
I’m going to repeat this several times throughout the guide, but it’s important: WHENEVER A DRONE LARGER THAN A TINYWHOOP IS ON YOUR WORKBENCH, ALWAYS, ALWAYS, ALWAYS REMOVE THE PROPELLERS. NO EXCEPTIONS. I joke with friends and family that cinewhoops chop fingernails, freestyle drones chop fingers, and long range drones chop both arms and legs. If you don’t believe me, Google it.
IF YOU HAVEN’T looked into how FPV drone propellers should be installed and which direction each one should face, it’s a good idea to mark them before taking them off. That way, when it’s time to put them back on, you’ll know which propeller went where — and not just where it went, but also which side was facing up. Installing the correct propeller upside down can make the drone flip over instantly. I’m actually planning a separate article about FPV drone propellers soon.
Table of Contents
- What is Betaflight and why do you need it?
- Betaflight installation and first connection
- Betaflight won’t connect to the FC: common problems
- Betaflight preflight checklist
- Betaflight configuration backup
- Setup tab – is the FC orientation correct?
- Ports tab – is the hardware assigned to the correct UARTs?
- Receiver tab – is your controller actually controlling the drone?
- Modes tab – assigning functions to controller switches
- Motors tab – are the motors spinning the way Betaflight expects?
- Failsafe tab – what happens if you lose the control link?
- Video Transmitter tab – do you have FPV video?
- OSD tab – the most important information in front of you
- Final check before your first flight – does the drone arm?
- Why won’t Betaflight let the drone arm?
- Ready for your first FPV flight
What is Betaflight and why do you need it?
Betaflight is open-source flight controller firmware that runs on your drone’s FC. It receives data from the sensors connected to the FC — both built-in and external — as well as pilot commands from the radio receiver. Based on that information, it controls the drone’s motors — or, more precisely, sends commands to the ESCs, which in turn control the motors.
Put simply, Betaflight is the software that helps the drone understand what it needs to do when you use the controller to tell it to climb, rotate, or fly in a particular direction.
If you’re still not sure what the difference is between an FC, ESC, receiver, and the other components, start with my guide to FPV drone parts.
Betaflight firmware vs Betaflight app
To view and change Betaflight settings, you use the Betaflight app. Yeah, it’s a little confusing — Betaflight and Betaflight. The first is the firmware running on your FC, while the second runs on your computer and is used to configure and manage the firmware. It was previously called Betaflight Configurator. Whenever I mean the first one in this guide, I’ll call it Betaflight firmware, or simply firmware. When I mean the second one, I’ll just call it Betaflight.
With the drone connected to your computer over USB, Betaflight lets you check whether the receiver is working, configure controller switches, verify motor order and direction, set up the OSD and video transmitter (VTX), and change many other FC settings. Later, once you have more experience, you can also use it to adjust much more advanced flight settings.
What about a BNF drone?
However, if you’ve just bought a prebuilt BNF (Bind-and-Fly) drone, your first Betaflight setup shouldn’t begin with updating the firmware or changing every setting you can find. The manufacturer will usually have already installed an appropriate Betaflight firmware version and prepared a basic configuration for that particular drone. Before the first flight, our goal isn’t to “configure the drone from scratch,” but to check that the important settings are correct, that your controller inputs reach the drone as expected, and that it’s safe to fly.
What about a PNP drone?
Okay, I have to disappoint you a little — if you bought a PNP drone, simply checking the configuration probably won’t be enough. There is one exception: if the drone uses a DJI O3 or O4 Air Unit and you’re using a compatible DJI FPV Remote Controller through the DJI system. In that case, you may not need a separate radio receiver, although the flight controller still needs to be configured correctly for the DJI control signal. Otherwise, a PNP drone doesn’t come with a radio receiver, so you’ll need to connect or solder one in and then bind it to your FPV controller. It’s not particularly difficult, but we won’t cover that in this guide.
Betaflight installation and first connection
First, you’ll need the Betaflight app. The easiest way to use it is directly in your browser at app.betaflight.com. Because it’s a Progressive Web App (PWA), you can also install the web app and use it offline. If you prefer a traditional desktop application, Betaflight is also available for Windows, macOS, and Linux. However, that isn’t necessarily the best option, as the web version gets the latest features first. You probably won’t need most of them for your first few flights, but in future guides you’ll see why they can be useful. By the way, the version of the Betaflight app doesn’t necessarily have to match the Betaflight firmware version installed on your FC, although very old and very new versions may not be compatible with each other.
Once you’ve installed and opened the app — or simply opened the web version — connect the drone’s FC to your computer with a USB cable using the USB-C or Micro-USB port on the FC.
Once the FC is connected, Betaflight should give you the option to connect to it. Select the detected FC and click Connect. If everything works, the main Betaflight interface should open with your drone’s configuration. If the FC doesn’t appear in the list or you get an error when trying to connect, continue to the next section.
There’s one important thing to understand about powering the FC. When the drone is connected only by USB, the FC itself and some of the components connected to it receive power, but that doesn’t necessarily mean the entire drone is powered. Depending on the specific FC and how the drone is wired, the ELRS receiver, GPS, and other small components may receive power over USB, while the ESC, motors, and some VTXs may still require the main battery. So it’s completely normal for Betaflight to work over USB while, for example, your goggles show no FPV video or the motors won’t spin in the Motors tab. Some of the checks later in this guide will require the drone’s battery to be connected as well. But we’ll get to that later. For now, let’s talk about problems.
Betaflight won’t connect to the FC: common problems
There are several common reasons why Betaflight may fail to connect to your FC:
USB is already in use
One of the simplest problems is that something else is already using the FC’s USB connection. If that’s the case, Betaflight will likely show a “Failed to open USB device” error when you try to connect. Do you have another browser window with Betaflight open and already connected to the FC? Maybe another application is using it? My recommendation is to completely close any programs you don’t need and try again.
The “wrong” USB cable
I’d guess this is one of the most common problems. We all have piles of USB cables at home for charging various devices, but not all USB cables can transfer data — some are designed only for charging and power. So if your computer doesn’t detect the drone at all when you plug it in, one of the first things worth trying is a different USB cable. Personally, I mark all the USB cables at home that support data transfer so I don’t accidentally grab the wrong one and then spend time wondering why nothing works.
Missing or incorrect drivers (#usb-drivers)
At home, I mostly use a Mac, and I haven’t personally had to deal with many driver problems. On Windows, however, driver issues can sometimes prevent Betaflight from detecting an FC or accessing it correctly in DFU mode. If the FC doesn’t appear at all, or Windows shows it as an unknown or problematic device, a driver issue is one of the things worth checking.
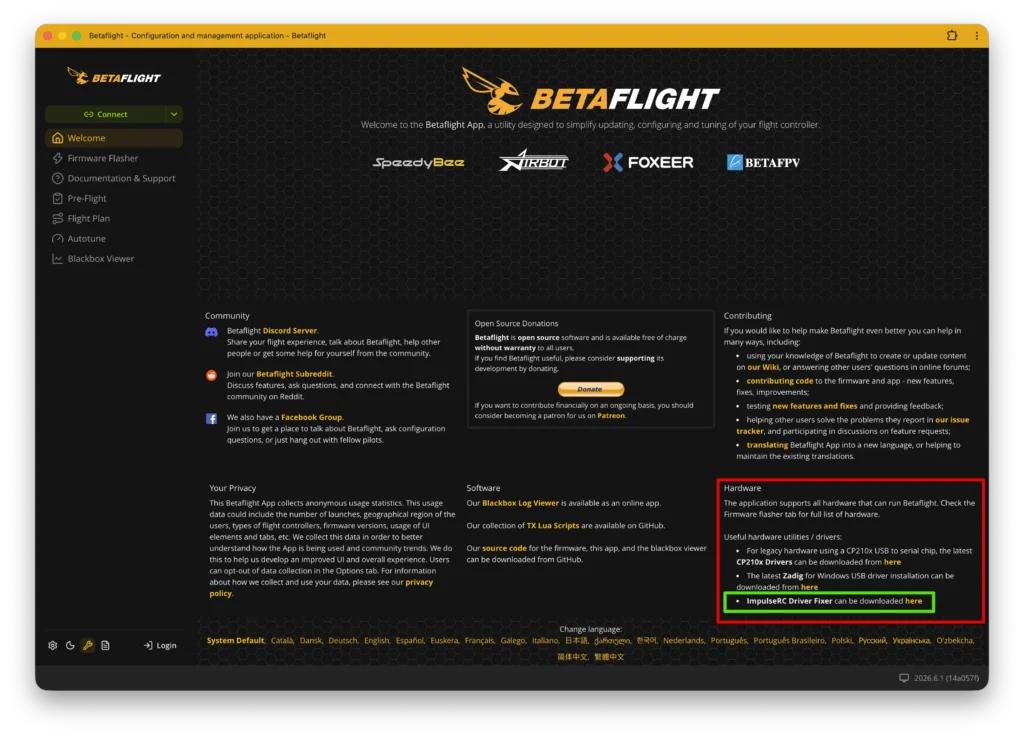
Betaflight itself provides links to the required drivers on its initial Welcome screen. In the lower-right corner, you’ll find a Hardware section with links to several drivers. I’d recommend starting with the ImpulseRC Driver Fixer.
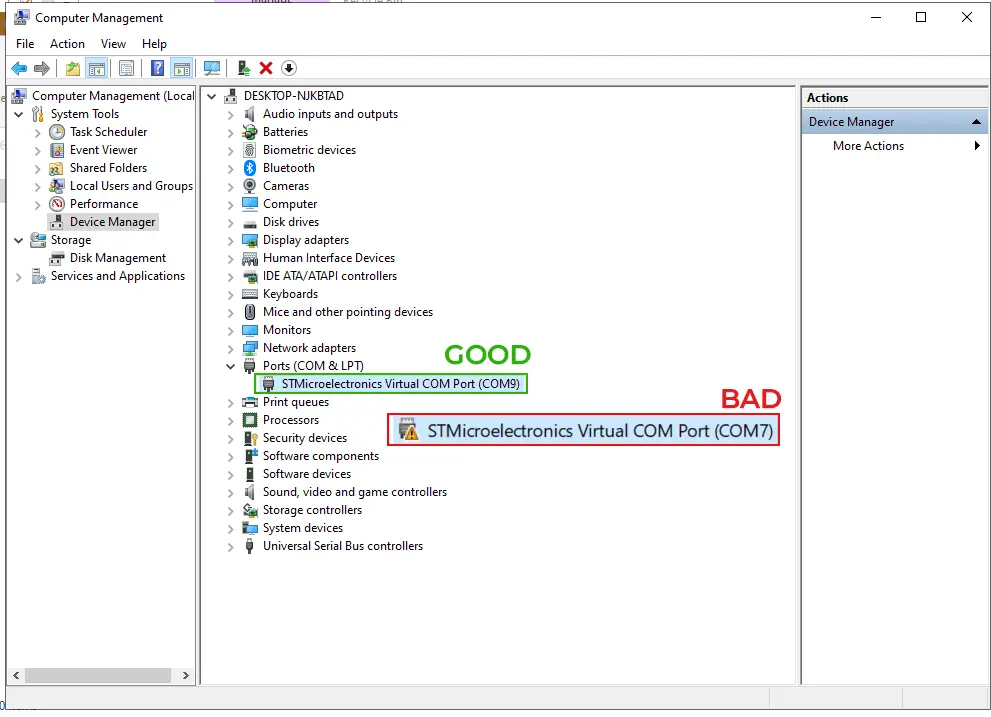
Of course, not every Windows computer will have this driver problems. For example, my old Windows 10 PC recognizes a drone FC as soon as I connect it, and I’m pretty sure I never installed any additional drivers on it.
USB hub
A USB hub can sometimes be a lifesaver when your computer doesn’t have enough USB ports. However, if you’re having trouble connecting to the FC, try connecting it directly to the computer instead. USB hubs — especially unpowered ones — can sometimes cause connection or power-related problems.
FC is in DFU mode
You’re unlikely to run into this with a BNF or PNP drone, but if you built the drone yourself, it’s entirely possible. Many FCs have a Boot button that can put the FC into DFU (Device Firmware Upgrade) mode. DFU mode is used to flash firmware onto the FC — whether that’s another version of Betaflight or completely different flight controller firmware such as iNav or ArduPilot. While the FC is in DFU mode, you won’t be able to connect to it normally through Betaflight.
I’ve actually run into this “problem” myself. At the beginning of the flying season, I couldn’t figure out why I was completely unable to connect to one of my drones. The strangest part was that I could connect to it using the SpeedyBee mobile app — SpeedyBee FCs often have a built-in Bluetooth module. The app connected to the FC over Bluetooth without a problem, but over USB? Nothing.
Eventually, I noticed that one of the drone’s side plates was touching the FC — right where the Boot button was located.
Betaflight preflight checklist
Before we go through each setting in detail, here’s the complete Betaflight preflight checklist:
- Configuration backup created
- FC orientation is correct
- Receiver channels respond correctly
- ARM switch works
- Motor order is correct
- Motor directions are correct
- Failsafe has been tested
- FPV video is visible in the goggles
- OSD is configured
- Propellers are installed correctly
Betaflight configuration backup
Before we start changing or checking individual settings, let’s begin with the Presets tab and save a backup of the current Betaflight configuration.
Over time, you’ll almost certainly change a setting or two. And at some point, something may get messed up. That’s why, before changing anything, I strongly recommend saving a copy of your current drone configuration. Even if you only plan to look around Betaflight for now, having a copy of the original settings won’t hurt. If you later change an important parameter by accident, click the wrong button, or decide to experiment with the settings, you’ll have a backup that could save you a lot of time.
The easiest way to do this is to connect to the FC in Betaflight and use Presets → Save backup. This saves a backup of the FC configuration to a file, which you can later use to restore the settings with Presets → Load backup. I recommend giving the file a name that will still make sense six months from now — for example, include the drone model, Betaflight version, and the date the backup was created. If you start experimenting more with Betaflight later on, it’s worth creating a new backup before every major configuration change.
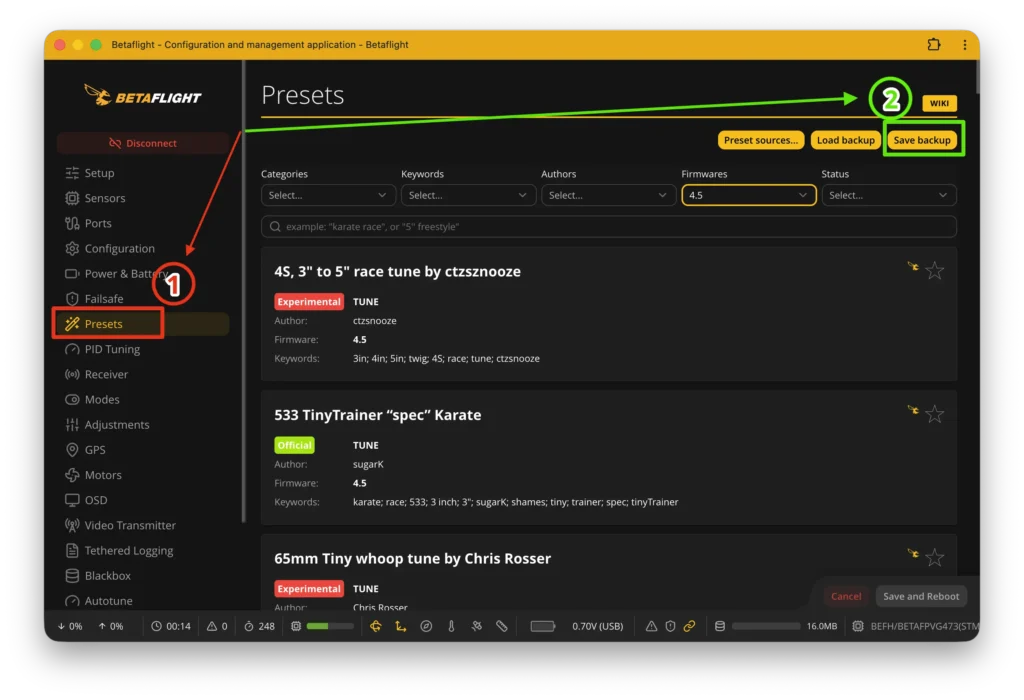
If the Save backup button isn’t available for your FC or firmware version, you can also save the configuration through the CLI. Open the CLI tab and enter “diff all”. This command shows the settings that differ from the defaults for the Betaflight version you’re using. You can copy the output and save it to a text file. Another option is the “dump” command, which provides a much more complete view of the FC configuration. In practice, diff all is usually the more convenient way to keep an easy-to-review copy of your drone settings, while dump can be useful for troubleshooting or when you want to see the entire configuration.
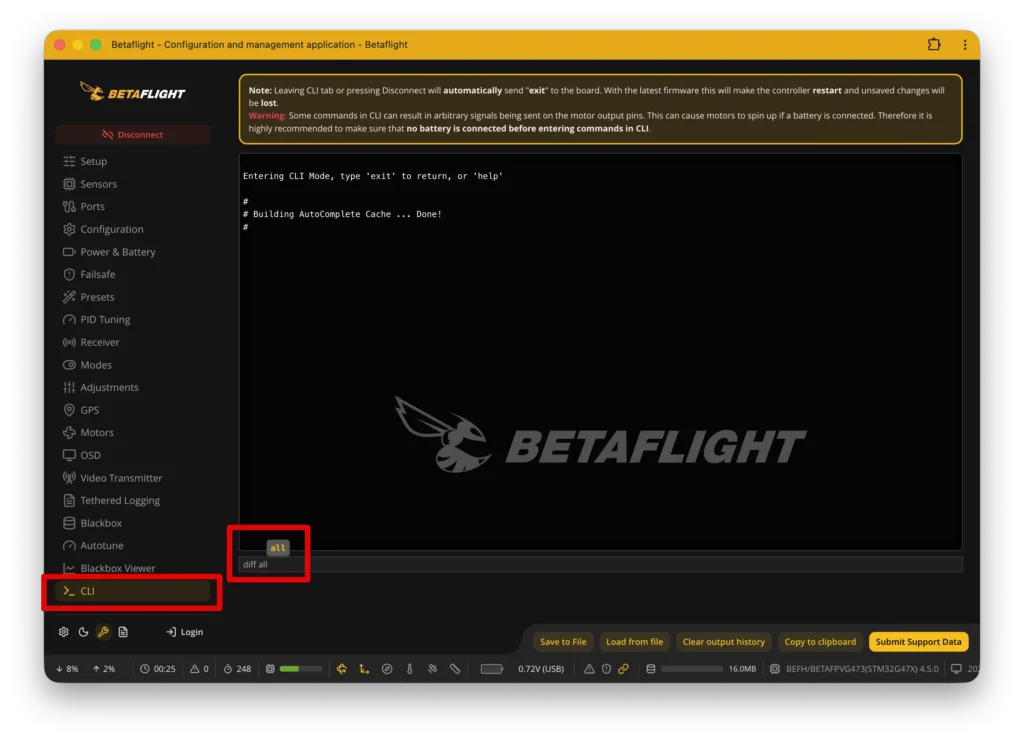
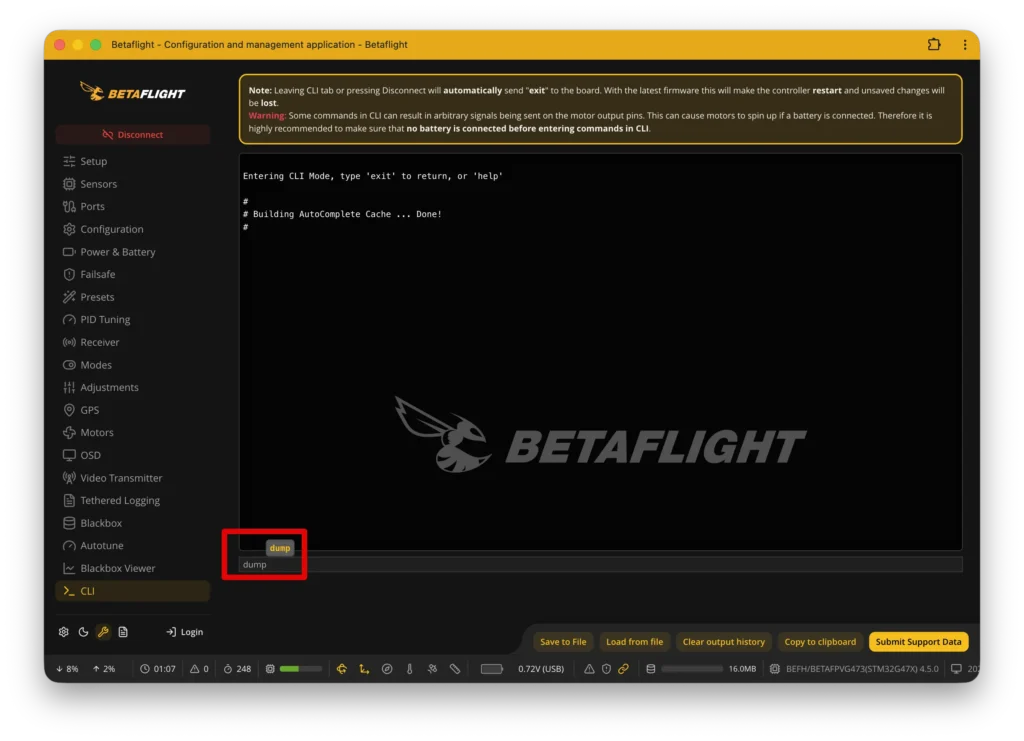
It’s important to understand that a configuration backup isn’t a universal “copy of the drone” that you can restore to any Betaflight version or any other FC. As Betaflight versions change, settings, their names, and their available values can change as well — even on the same drone. That’s why it’s worth keeping a note of which Betaflight version was used to create each backup. After updating the firmware, you also shouldn’t blindly restore an old configuration without first checking whether it’s compatible.
At this point, the most important thing is simple: don’t change anything yet. First, save the drone configuration exactly as you received it from the manufacturer. If something stops working later, you’ll always have the original settings to compare against and, if necessary, a way to return to the starting configuration.
Setup tab – is the FC orientation correct?
Now that we’ve saved the original configuration, we can start the first real checks.
Open the Setup tab. Among other information, you’ll see a 3D model of the drone that should mirror the position and movements of the real drone. Pick the drone up from the workbench and slowly move it in different directions. Tilt it left and right (Roll), tilt the nose up and down (Pitch), and rotate it around its vertical axis (Yaw). The model in Betaflight should move in exactly the same way. When you place the drone level, the model should also be level and facing the same direction.
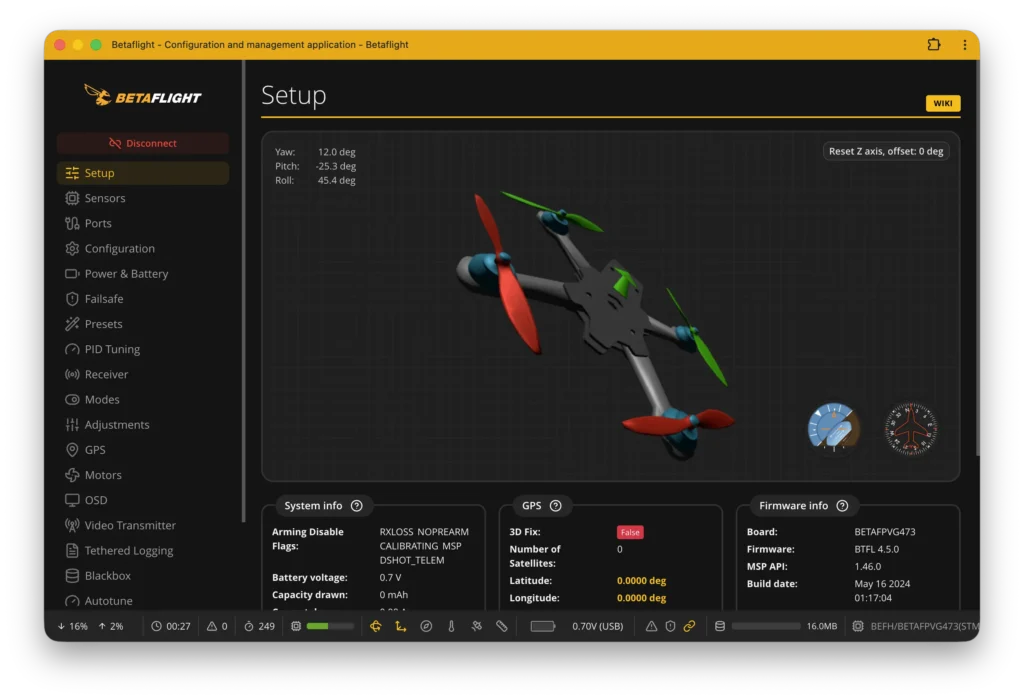
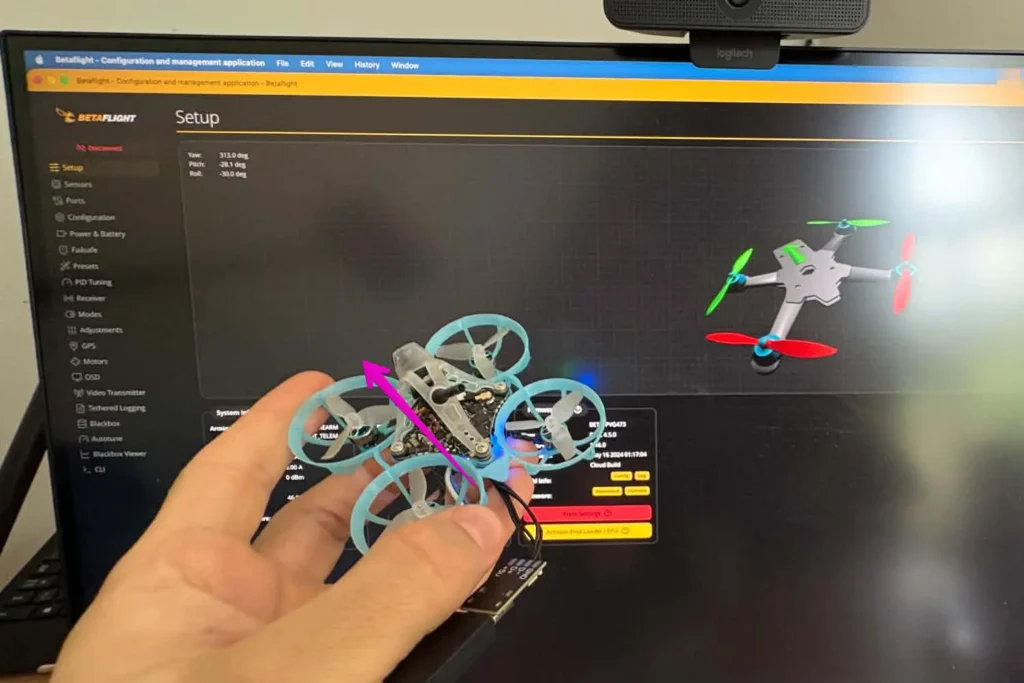
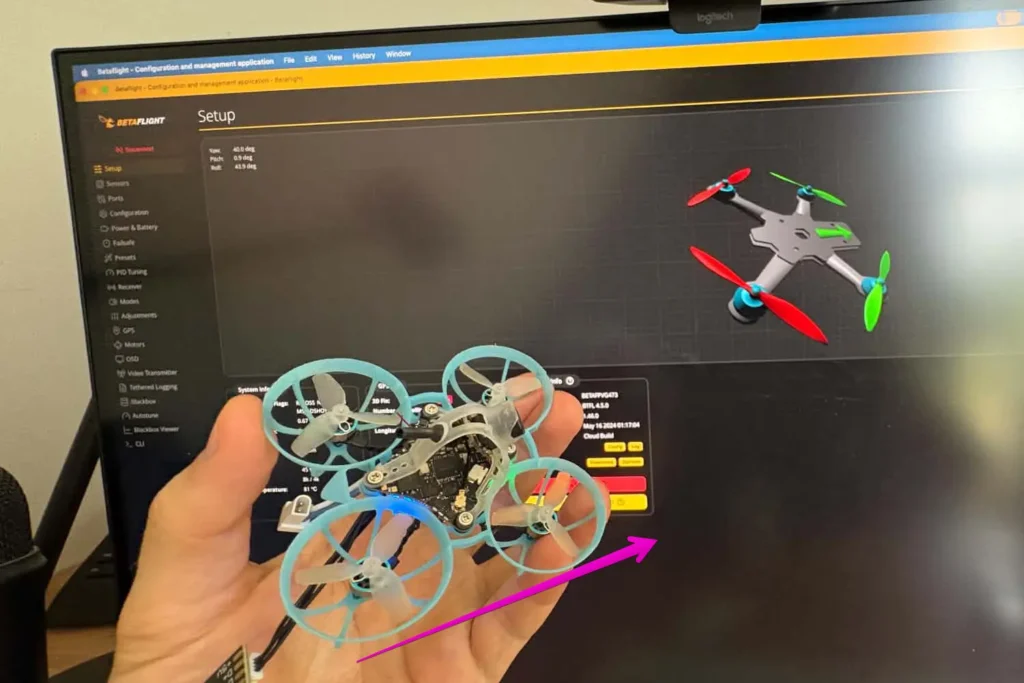
Betaflight determines the drone’s orientation using sensors on the FC. One of the most important for this check is the accelerometer, which measures acceleration and allows the FC to determine its tilt relative to gravity. Together with the gyroscope, which measures rotational speed around three axes, these sensors allow Betaflight to understand how the drone is moving and how it is oriented in space.
However, Betaflight needs to know more than just what the sensors are measuring — it also needs to know how the FC is physically mounted in the drone. An FC board normally has a defined forward direction, but depending on the drone’s design, it may be installed rotated by 90°, 180°, or another angle. In that case, the corresponding FC orientation (Board Alignment) needs to be configured in Betaflight. On a factory-built BNF drone, this should already be set correctly, so for now our goal isn’t to change it — only to make sure it’s correct.
If you tilt the physical drone forward but the 3D model tilts sideways, rotate the drone to the right but the model turns left, or place the drone normally and the model appears rotated by 90° or even upside down, don’t continue preparing for the first flight until the problem has been fixed. This may indicate an incorrect FC orientation. If the model moves in the correct direction but appears slightly tilted when the drone is sitting on a level surface, recalibrating the accelerometer using Calibrate Accelerometer in the Sensors tab may be enough. If not, newer versions of the Betaflight App also include a Board Alignment Wizard in the Sensors tab. It guides you through determining the correct FC orientation using accelerometer and gyroscope data. This is a relatively new Betaflight feature as of August 2026, when I’m writing this article.
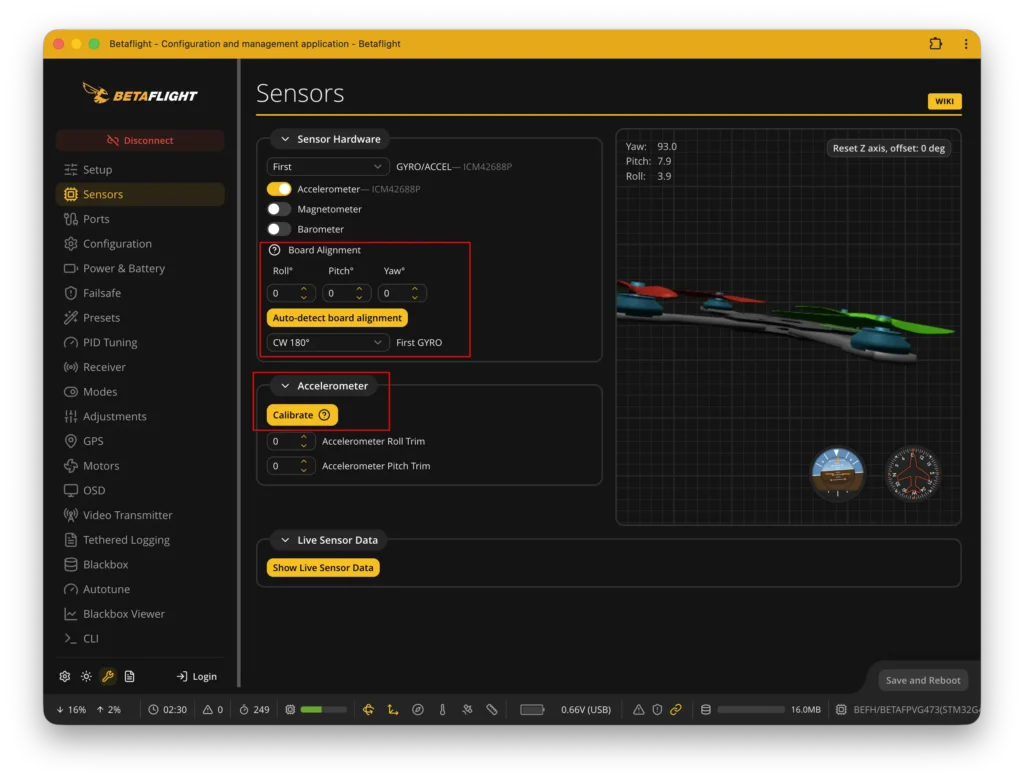
You don’t need to connect the battery for this check — USB provides enough power for the FC and its sensors. Keep the propellers off at this stage as well.
Ports tab – is the hardware assigned to the correct UARTs?
Next, let’s take a look at the Ports tab. This is where Betaflight defines which devices connected to the FC use its different UARTs. Put simply, UARTs allow the FC to exchange data with the radio receiver, GPS, video system, and other peripherals. An FC may have several UARTs, shown in Betaflight as UART1, UART2, UART3, and so on. Each UART-based device needs to be configured on the UART it is physically connected or soldered to.
On the FC, you’ll often see pads labeled TX1/RX1 (or T1/R1), TX2/RX2 (T2/R2), and so on. The number indicates which UART the device is connected to. For example, an ELRS receiver using the CRSF protocol might be connected to one UART. In that UART’s row, Serial RX should be enabled. A GPS receiver connected to another UART may have GPS selected under Sensor Input. Yet another UART may be used by the video system or for VTX control. The exact Ports configuration depends on the drone, FC, and installed hardware, so it’s completely normal for two different drones to look very different in this tab.
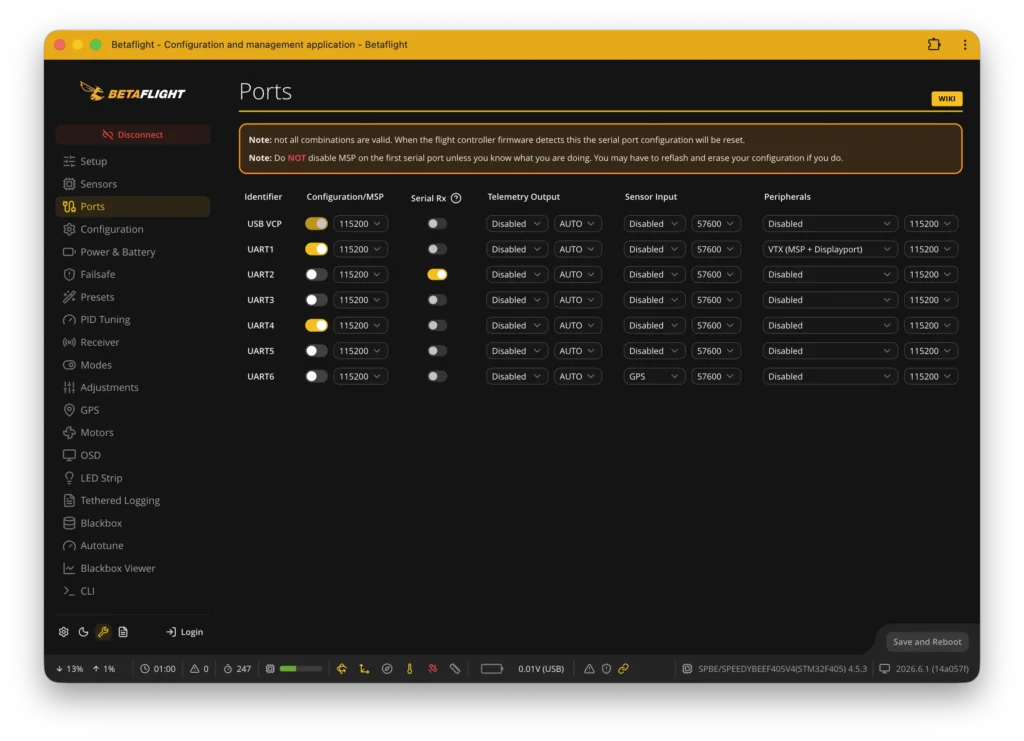
Don’t change anything in the Ports tab just because you don’t know what a setting means. Disable Serial RX on the wrong UART and the FC may stop receiving commands from the radio receiver. Change the UART used by the GPS and Betaflight may stop seeing the GPS. Change the port used by the video system or VTX control and you may lose some of its functionality. So if you see a setting in the Ports tab that you don’t understand, for now it’s best to leave it exactly as the manufacturer configured it.
At this stage, it’s enough to make sure the main peripherals have UARTs assigned to them. We’ll check whether the radio receiver, GPS, and other devices actually work in their respective Betaflight tabs later. A Ports tab that looks correct doesn’t necessarily mean the device itself is connected and working properly.
Receiver tab – is your controller actually controlling the drone?
One of the most important checks before your first flight is making sure the FC is receiving the correct commands from your controller. Turn on the controller and make sure it’s bound to the receiver in the drone. Then open the Receiver tab in Betaflight. Here you’ll see the four main control channels — Roll, Pitch, Yaw, and Throttle — as well as additional AUX channels, which are usually assigned to switches and other controls on your controller.
Move each controller stick separately and watch what happens in Betaflight. If you don’t remember which stick controls what, my FPV controller guide has a quick refresher.
Moving the Throttle stick should change only the Throttle channel, Roll should change only Roll, Pitch should change only Pitch, and Yaw should change only Yaw. Check the controller switches as well — flipping them should change the corresponding AUX channel values. If the controller and receiver are bound but nothing moves in the Receiver tab, first go back to the Ports settings we checked earlier and verify the receiver configuration. Serial RX should be enabled for the UART the receiver is connected to. The problem could also be the physical connection between the receiver and the FC: the receiver’s RX pad should connect to the FC’s TX pad, while the receiver’s TX pad should connect to the FC’s RX pad.
If the Ports settings look correct, check the Receiver Mode and Serial Receiver Provider settings in the Receiver tab. If you’re using an ELRS receiver — and I hope you are — Receiver Mode should be set to Serial (via UART) and Serial Receiver Provider to CRSF. If the wrong protocol is selected, the receiver may be successfully bound to the controller, but Betaflight won’t understand the data it’s sending, so the control channels won’t work correctly in the Receiver tab.
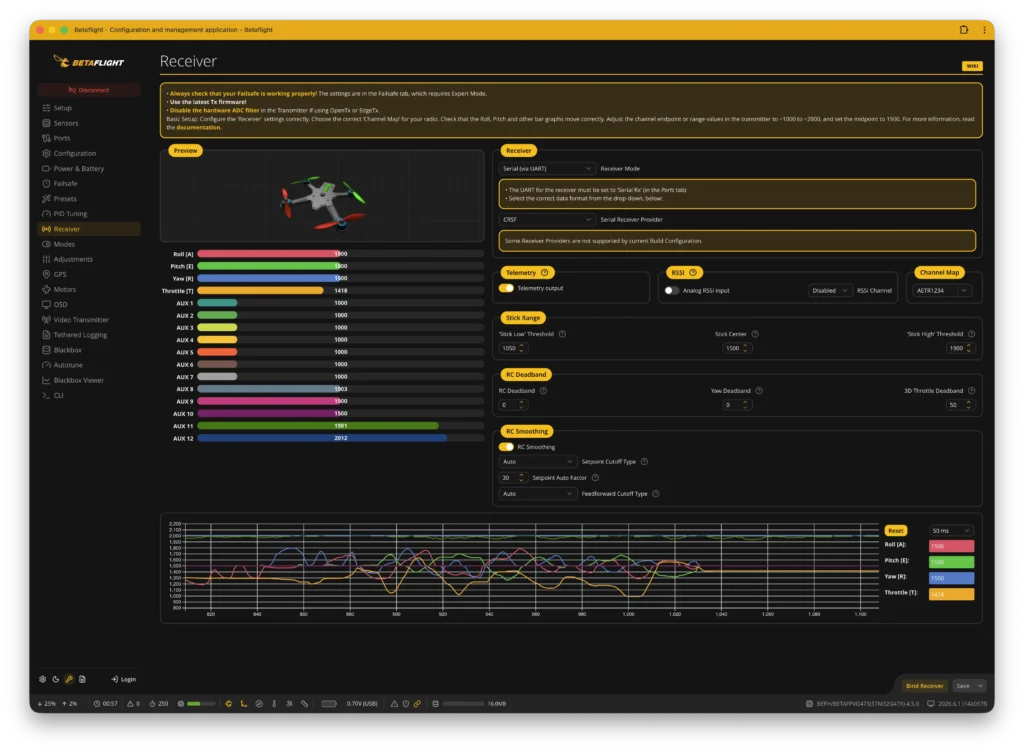
In case moving one stick makes the wrong channel move in Betaflight — for example, raising Throttle changes Pitch — the Channel Map is probably incorrect. You may come across channel orders such as AETR, TAER, and other variations. Each letter represents one of the four main channels: A — Aileron (Roll), E — Elevator (Pitch), T — Throttle, and R — Rudder (Yaw). The Channel Map needs to match the channel order sent by your controller — most likely AETR1234. However, the important thing isn’t whether the setting says AETR or TAER. What matters is the end result: when you move a specific control on your controller, the corresponding channel in Betaflight should move.
A friend of mine ordered a Happymodel drone directly from the manufacturer and received it with the wrong Channel Map setting. He didn’t check it and, understandably, was eager to try his first drone as soon as possible. As soon as he armed it, the drone shot into the sky at full speed, landed on his neighbor’s roof, and then fell onto the asphalt. The result: one motor was damaged beyond repair and had to be reordered. His second flight had to wait another few weeks.
Once you’ve confirmed that the channels aren’t mixed up, it’s also worth checking their values. In the Betaflight Receiver tab, each channel has a numerical value that changes depending on the physical position of the corresponding control on your controller. For the main control channels, the usual values are approximately 1000 at the minimum position, 1500 at center, and 2000 at the maximum position. For example, with Throttle all the way down, its value should be around 1000. With the Roll, Pitch, and Yaw sticks centered, their values should be around 1500. At their endpoints, they should reach approximately 1000 or 2000, depending on the direction of movement.
Don’t worry if you see 1498 or 1502 instead of exactly 1500 at center, or if the endpoint values are a few points away from 1000 and 2000. Small deviations are normal. However, if you see something like 1450 at center, Throttle doesn’t get anywhere close to 1000 at its lowest position, or a channel stops at 1800 with the stick pushed all the way to its endpoint, that’s a sign that the channel centers or endpoints on the controller need to be checked and adjusted.
Finally, pay attention not only to which channel moves, but also to which direction it moves. The drone model in the Betaflight Receiver tab should respond to your stick movements exactly as commanded. For example, if you move Roll to the right but Betaflight interprets it as a roll to the left, that channel is reversed and needs to be corrected before you fly. I really hope that isn’t the case for you. If it is, Oscar Liang has a detailed guide explaining how to correct channel centers and endpoints, as well as reversed channel directions.
After this check, we need to be sure of three things:
- the controller signal reaches the FC,
- each stick controls the channel it’s supposed to control, and
- the channel directions and value ranges are correct.
Only then does it make sense to move on to the controller switches and their functions — ARM, flight modes, Beeper, and others.
There’s a good chance you won’t run into any of the problems we’ve covered so far. Personally, the few BNF drones I’ve bought arrived properly configured and ready to go. But after seeing what happened to my friend, I wasn’t going to simply skip over these checks.
Modes tab – assigning functions to controller switches
Now that we’ve checked that the controller sticks and switches are reaching the FC, we can define what those switches should actually do. That’s what the Modes tab in Betaflight is for. Here, you can assign different drone functions to the controller’s AUX channels. When you flip a switch on the controller, the value of its AUX channel changes, and Betaflight uses that value to activate or deactivate the corresponding function. On a BNF drone, several functions will usually already be assigned, but I strongly recommend checking them anyway.
The most important one is ARM. Until the drone is armed, Betaflight firmware won’t allow the pilot to control the motors. Arming the drone puts it into a flight-ready state in which the motors can start spinning and the drone can respond to Throttle and other pilot commands. For safety, I recommend assigning ARM to a dedicated physical switch that you’re unlikely to flip accidentally while flying. A common choice is a two-position switch on the left side of the controller, usually assigned to AUX1.
Before your first flight, you need to know not only how to arm the drone but also how to disarm it instantly. After a crash or when you lose control of the drone, this can be one of the most important reactions you develop as a pilot. If your drone “ends up” in a tree, it would be a shame to have the motors keep spinning while trying to cut through a dozen branches.
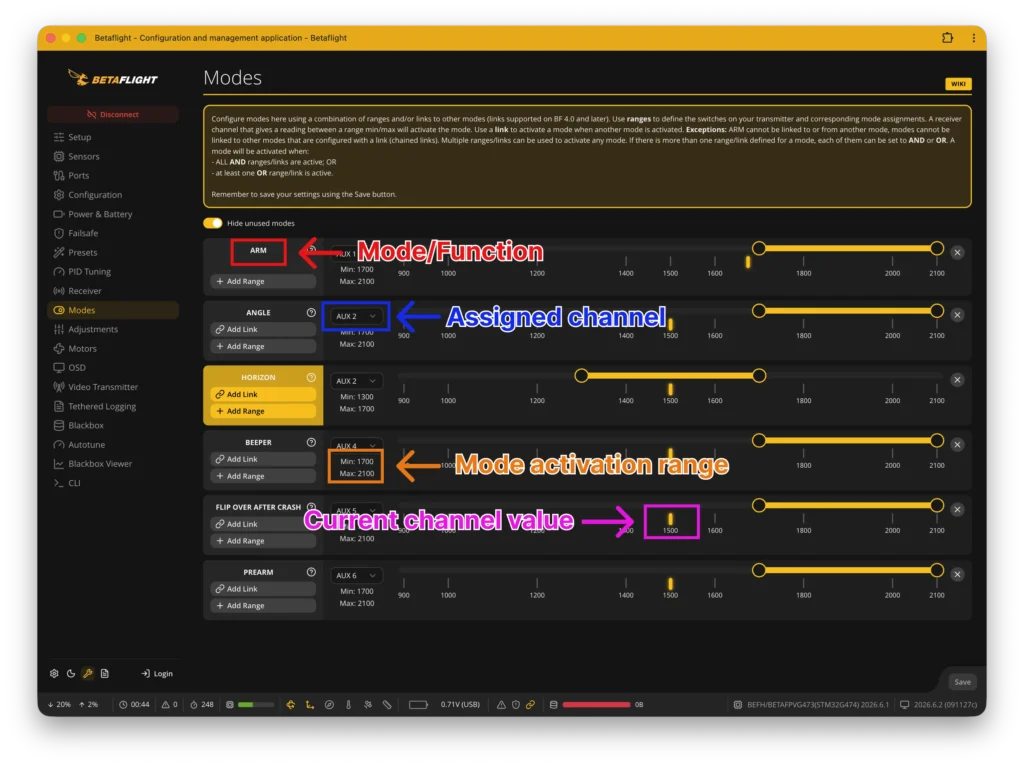
To check the ARM setup, find ARM in the Modes tab — it should be right at the top — and see which AUX channel is assigned to it. For example, if ARM is assigned to AUX1, flipping the ARM switch on your controller should change the AUX1 value. The Modes tab also shows the activation range for the selected channel. With the switch in the ARM position, the channel value indicator should move into that range. Betaflight will then visually indicate that the function is active. If flipping the switch changes the AUX value but the indicator doesn’t enter the activation range, the function won’t activate — in that case, you’ll need to adjust its activation range.
Common Betaflight modes and functions
Besides ARM, you’ll find quite a few other functions in the Modes tab. Before your first flight, it’s worth knowing at least a few of the most commonly used ones:
- ACRO — a flight mode in which you have full control over the drone’s movement. When you release the sticks, the drone maintains its current orientation instead of automatically leveling itself. This is the mode used for freestyle tricks and other aerobatic maneuvers. Beginners may find it more difficult than ANGLE or HORIZON, but over time, most FPV pilots eventually move to ACRO. Don’t be surprised if you can’t find a mode called ACRO in the Modes tab: ACRO is Betaflight’s default flight mode and is active whenever no self-leveling mode, such as ANGLE or HORIZON, is enabled.
- ANGLE — a stabilized flight mode in which the drone automatically returns to a level attitude when you release the sticks. The maximum tilt angle is also limited.
- HORIZON — another stabilized flight mode in which the drone automatically returns to a level attitude when you release the sticks. However, unlike ANGLE mode, the maximum tilt angle isn’t limited. It’s essentially a middle ground between ACRO and ANGLE.
- BEEPER — activates a buzzer connected to the FC or, depending on the configuration, uses the motors to produce an audible signal. It’s extremely useful when you’re trying to find a crashed drone in tall grass or another place where it’s difficult to see.
- FLIP OVER AFTER CRASH — often called Turtle Mode. If the drone crashes and ends up upside down, this mode lets you use the motors to try to flip it back onto its feet. Use it carefully: if the propellers are caught in grass, branches, or other obstacles, trying to flip the drone over can damage the propellers, motors, or even the ESC.
- PREARM — an additional safety feature used together with ARM. I like assigning it to a momentary button — one that returns to its original position when you release it. PREARM needs to be activated before ARM, adding a second step to the arming sequence. That way, accidentally flipping the ARM switch alone won’t arm the drone. Not every pilot uses PREARM, but if safety matters to you, I recommend it. And yes, I use it even on tiny, relatively harmless tinywhoops — mainly to maintain the same safety habits across all of my drones.
It’s also good to know that if no other flight mode — such as ANGLE or HORIZON — is active, the drone will use ACRO mode by default. In the example shown above, ANGLE mode is active when AUX2 is approximately between 1700 and 2100, while HORIZON is active from around 1300 to 1700. The AUX2 range below approximately 1300 is left empty, so neither of these modes is active there and the drone defaults to ACRO.
When you’re just getting started, there’s no need to assign dozens of Betaflight functions to switches right away. For your first flight, the most important thing is to have an ARM switch that’s easy to reach and to know its ARM and DISARM positions by heart. If you’re not yet confident flying in Acro mode, it’s worth assigning ANGLE or HORIZON to another switch. BEEPER is another one of those functions that’s better to set up before your first crash than after the drone is already lying somewhere in tall grass. One of my first flights with the first 5-inch drone I built was without BEEPER. What happened? Here’s the video:
REMINDER: While we’re testing the Modes tab in Betaflight, the propellers should still be removed. As you flip the switches on your controller, make sure the functions you expect are actually the ones being activated. It’s especially important to make sure ARM isn’t assigned to the wrong switch or switch position — the first time you connect a LiPo is not when you want to discover that the drone is already armed. I don’t even want to think about that.
Motors tab – are the motors spinning the way Betaflight expects?
This is one of the more interesting — and more serious — checks before your first flight: making sure Betaflight is controlling all four motors correctly. We’ll check two separate things here: 1) whether the motors are assigned to the correct positions in Betaflight (motor order) and 2) whether each motor spins in the correct direction (motor direction). A mistake in either of these settings usually results in a very short first flight — once you arm the drone and raise the Throttle, it may immediately tip to one side or flip over. That’s how I destroyed my first set of props. Another drone I had would simply climb about 3 feet (1 meter) and immediately disarm itself.
Before continuing, REMOVE ALL PROPELLERS (if not done already before). Don’t forget to mark them so you know where and how to reinstall them later. This check requires connecting the battery and spinning the motors, so removing the propellers isn’t just a recommendation. Even the propellers on a small FPV drone can cause very serious injuries if they suddenly start spinning at high RPM. We’ll reinstall them only after all the checks are complete.
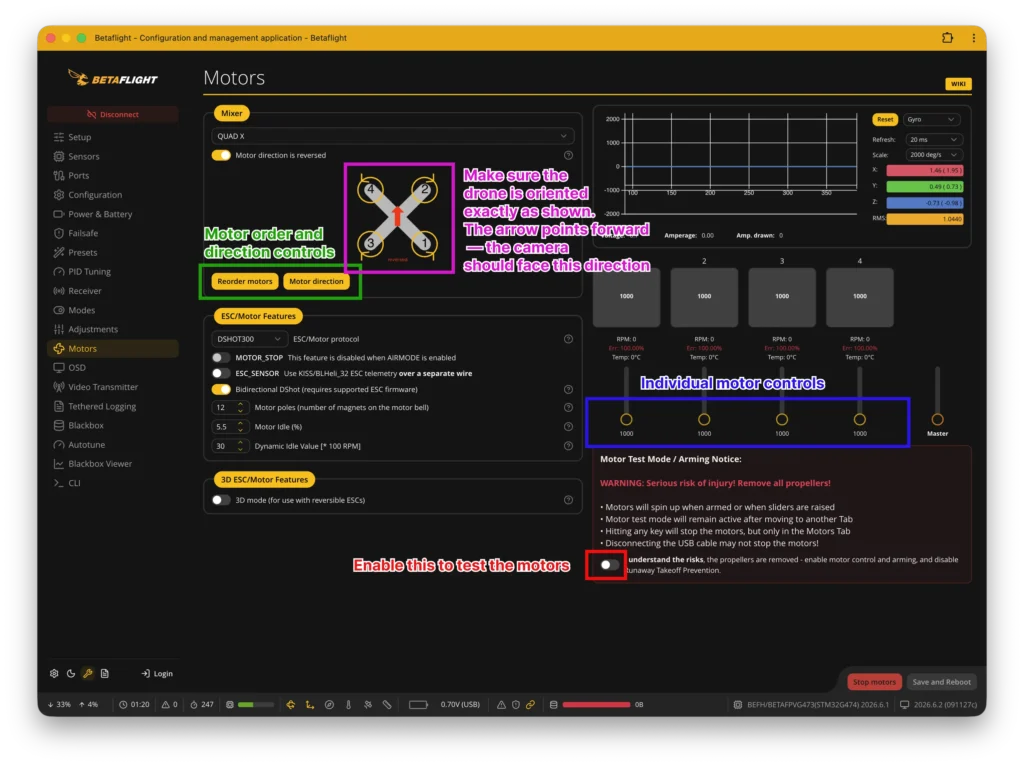
Open the Motors tab in Betaflight. Before Betaflight allows you to control the motors, it will ask you to confirm “I understand the risks”, acknowledging that the propellers have been removed and that you understand the potential danger. Connect the battery — USB power alone isn’t enough to run the motors. The Motors tab lets you spin each motor individually, so we’ll start by checking the motor order. If you select Motor 1 in the Betaflight diagram, the physical motor shown as Motor 1 in that diagram should start spinning. Repeat the same check with Motor 2, Motor 3, and Motor 4. What matters isn’t which numbering scheme seems logical to you — the physical location of each motor needs to match the motor layout used by Betaflight. Don’t raise the motor speed slider abruptly. Instead, click the slider to select it and then press the Up Arrow key a few times. That should be enough to see which motor is spinning.
If selecting Motor 1 makes the motor in the Motor 3 position spin, for example, the motor order is incorrect. In that case, Betaflight is sending a command to one motor, but a different ESC output is receiving it. Betaflight allows you to remap the motor outputs in software using the Reorder motors function, so incorrect motor order usually doesn’t mean you need to resolder any wires. Before moving on, make sure that every motor you select in Betaflight matches the physical motor shown in the diagram.
Once the motor order is correct, check the second thing: motor direction. On a quadcopter — a drone with four propellers — not all motors spin in the same direction. Two spin clockwise (CW), while the other two spin counterclockwise (CCW). Betaflight needs to know which motor direction layout is being used — Props In or Props Out — and the actual motor directions need to match it. The diagram in the Motors tab shows which direction Betaflight expects each motor to spin.
You can check the direction by briefly spinning one motor at a time at low speed. Sometimes the direction is easy to see immediately, although it can be harder with smaller motors. You can very carefully touch the side of the motor bell with your finger while it’s spinning slowly to feel which direction it’s rotating (make sure motors spin slowly – I’m opposing my conservative workbench safety principals with this). If even one motor spins in the opposite direction from what the Betaflight diagram shows, it needs to be corrected before you install the propellers. Motor direction can be checked and reversed using the Motor direction tool in Betaflight.
At this point, it’s worth looking at the entire chain of related settings:
FC orientation → motor order → motor direction → propeller direction
In the first step, we already checked whether Betaflight correctly understands the orientation of the FC and the drone itself. Now we’ve checked whether it’s controlling the correct motors and whether those motors are spinning in the correct directions. Later, we’ll install the correct propellers based on those directions. A mistake anywhere in this chain can lead to the same classic situation: the drone arms successfully, but as soon as you raise the Throttle, it jumps, tips to one side, or immediately flips over — sometimes even without you moving the Throttle stick at all.
If the motor order and motor directions match the diagram shown in Betaflight, everything looks good so far.
Failsafe tab – what happens if you lose the control link?
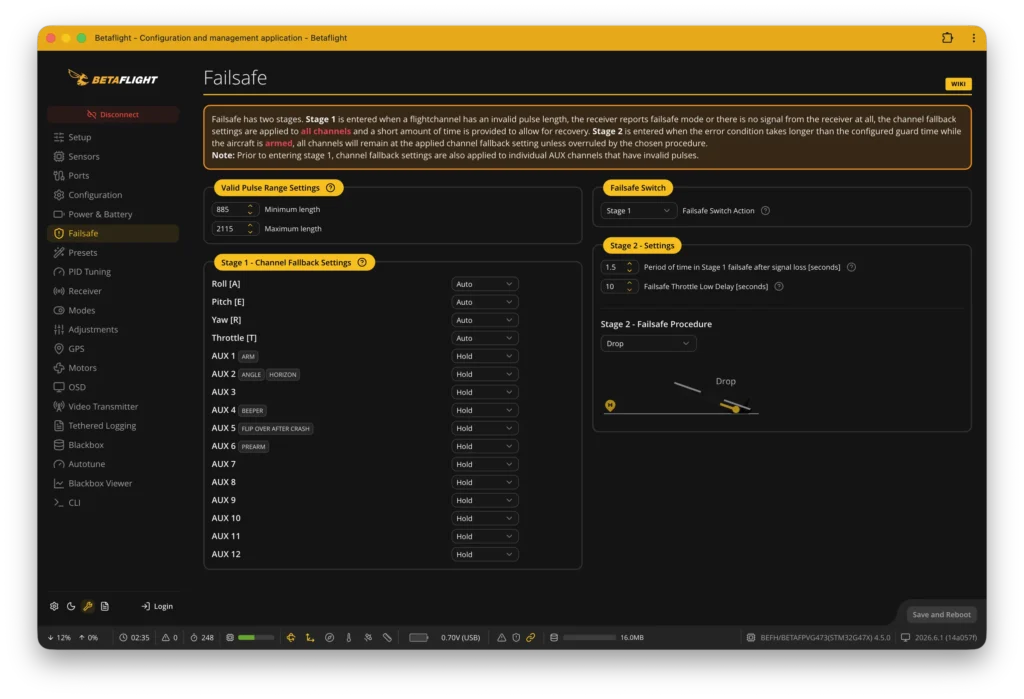
Before your first flight, it’s also worth checking the Failsafe — what happens to the drone if it loses its connection to the controller. And I’d like to think you won’t be testing the maximum range of your drone on your very first flight. With the default Drop configuration, if the control signal is lost and doesn’t recover during the initial failsafe period, Betaflight will eventually enter Stage 2 Failsafe, disarm the drone, and stop the motors. You can test this on the workbench with the propellers removed. Arm the drone, briefly raise the Throttle so the motors respond, lower it again, and then turn off your controller. With the default Drop procedure, the drone should eventually enter Stage 2 Failsafe, disarm, and stop the motors.
And again: the propellers must be removed when testing Failsafe. After the test, don’t forget to turn the controller back on before connecting the battery for the next check.
The Failsafe tab really deserves an article of its own because, depending on the hardware installed on the drone — a GPS receiver, for example — there are several different ways a drone can be configured to respond when Failsafe is triggered. If you don’t understand these settings yet, don’t change the Failsafe configuration blindly. Betaflight uses Drop as the default Stage 2 procedure, which disarms the drone and stops the motors. Other options, such as Landing Mode or GPS Rescue, should only be used once you understand how they work and have tested them properly.
Video Transmitter tab – do you have FPV video?
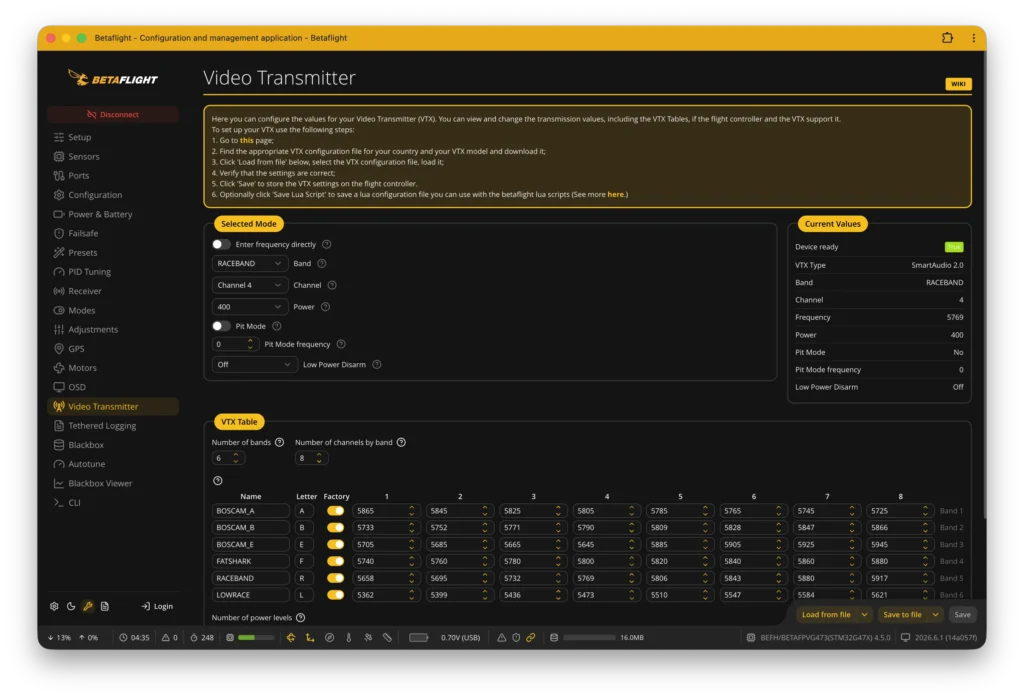
Before your first flight, turn on your FPV goggles and make sure you’re getting a stable video feed from the drone. If you’re using an analog FPV video system, make sure the VTX and goggles are set to the same Band/Channel, that the VTX transmission power (Power) is set correctly, and that Pit Mode hasn’t been enabled accidentally. With a digital FPV video system, for now it’s enough to check that the video system is linked to the goggles, that you have a video feed, and that you can see the Betaflight OSD information.
Before connecting the battery, always make sure the correct antenna is connected to the VTX as well — operating some video transmitters without an antenna can damage them.
OSD tab – the most important information in front of you
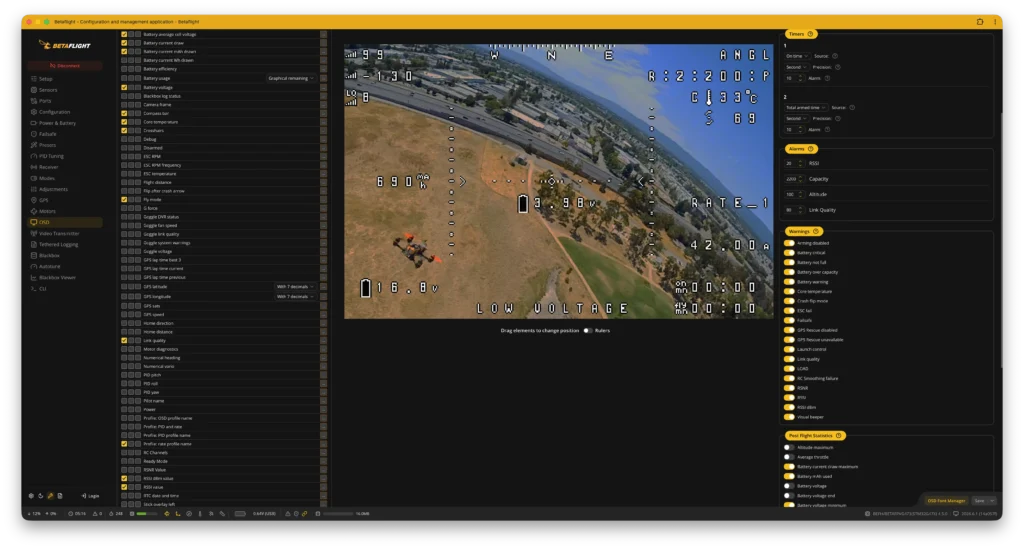
OSD (On-Screen Display) lets you see important information about the drone and your flight directly in the FPV video feed. Before your first flight, you definitely don’t need to build a HUD that looks like the cockpit of a spaceship — a few essential indicators are enough to get started. I recommend enabling Battery Average Cell Voltage, flight time (Timer 1), consumed battery capacity (Battery Current mAh drawn), Warnings, and radio link information — Link Quality (LQ) and RSSI dBm value.
When using ELRS, LQ and RSSI dBm value are particularly useful for monitoring the quality of the control link. LQ indicates how many of the expected data packets successfully reach the receiver, while RSSI dBm indicates the strength of the received radio signal.
You can always customize the OSD layout later to suit your preferences. Before your first flight, the important thing is simply to have the information you need to notice a low battery, a deteriorating control link, or a warning from Betaflight before it becomes a problem.
Final check before your first flight – does the drone arm?
Before installing the propellers, let’s quickly go through the most important checks one last time. The FC orientation is correct, all channels in the Receiver tab respond properly, their centers are around 1500, and their endpoints reach approximately 1000–2000. In the Modes tab, flipping the ARM switch changes the channel value and moves it into the correct activation range. Failsafe has been tested, and the motor order and motor directions match the Betaflight diagram. Also make sure the battery voltage is displayed correctly, that you have a stable FPV video feed, that the OSD is working, and that Betaflight isn’t showing any unexplained errors or warnings.
Disconnect the FC from the computer and turn on your controller. If you’re using ELRS and the receiver has been powered for a while without connecting to your controller, it may have entered Wi-Fi mode. If so, power-cycle the drone before trying to arm it. Now try to arm the drone. If you’re also using PREARM, don’t forget to activate PREARM as part of the arming sequence. If it arms — success! Disarm it again.
If everything looks good, you can disconnect both the USB cable and the battery and install the propellers. From this point on, treat the drone as a flight-ready aircraft. Once the battery is connected, the motors are capable of spinning the propellers.
Reinstall the propellers using the markings you made before removing them. If you forgot to mark them — no big deal. I’m actually planning to cover FPV drone propellers in the next article.
Why won’t Betaflight let the drone arm?
But what if the drone still won’t arm? Don’t panic. You can check the reason by reconnecting the drone’s FC to Betaflight and looking at Arming disable flags under System info in the Setup tab. MSP means the FC has an active connection to Betaflight, so we can ignore that flag while the FC is connected to the computer. Other flags point to problems that may be preventing the drone from arming. I won’t cover every possible flag in this article, but Betaflight has a detailed page explaining all of them.
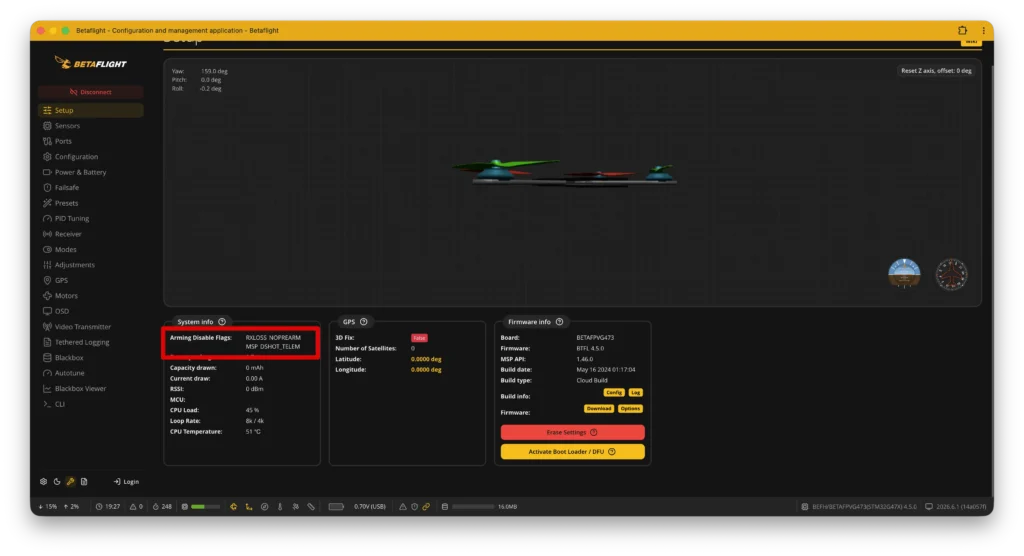
Some of the most common Arming disable flags you may encounter are:
- MSP — the FC has an active MSP connection, for example because it’s connected to Betaflight. This is normal when working over USB.
- CLI — you’re currently in CLI mode.
- RXLOSS — the FC isn’t receiving a valid signal from the radio receiver.
- THROTTLE — the Throttle value is too high, so the drone isn’t allowed to arm. You’ve probably encountered the same thing in an FPV simulator, where you need to lower the Throttle all the way before starting a flight. The same idea applies in real life — you don’t want the drone shooting into the air like a bullet the moment you arm it.
- ANGLE — the drone is tilted too far to arm. Place it on a level surface.
- CALIB — sensor calibration is currently in progress or hasn’t finished yet. Let the calibration complete.
- NOPREARM — PREARM is required but hasn’t been activated or toggled as required.
- RUNAWAY — Runaway Takeoff Prevention has been triggered because Betaflight detected an unsafe response during takeoff. Common causes include incorrect motor order or direction, incorrectly installed propellers, or incorrect FC orientation. Check the entire setup before trying to arm again.
Jei viskas tvarkoje, galime atjungti USB ir bateriją bei uždėti propelerius. Nuo šio momento su dronu elkitės kaip su skrydžiui paruoštu įrenginiu – prijungus bateriją motorai jau turės galimybę įsukti propelerius.
Grąžinkite propelerius, pagal anksčiau pasidarytą pasižymėjimą, kurį atlikote prieš nusiimdami juos. Jei visgi nepasižymėjot – nieko tokio. Kitas straipsnis greičiausiai bus apie propelerius.
Ready for your first FPV flight
If you’ve completed all the checks and haven’t found any problems, you’re ready. Find a suitable place to fly, put on your FPV goggles, and it’s time for your first FPV flight.
Sources
- https://www.mepsking.shop/blog/solving-the-issue-of-your-drone-flight-controller-not-connecting-to-betaflight.html
- https://www.unmannedtechshop.co.uk/blogs/knowledge-base/fpv-drone-not-connecting-betaflight-usb-driver-fix
- https://oscarliang.com/dfu-mode/
- https://oscarliang.com/fc-driver-issues-flash-firmware/
- https://oscarliang.com/speedybee-f405-v4/
- https://oscarliang.com/channel-map/
- https://oscarliang.com/adjust-tx-channel-mid-end-point/
- https://oscarliang.com/setup-failsafe/
- https://betaflight.com/docs/wiki/guides/current/Arming-Sequence-And-Safety
- https://betaflight.com/docs/wiki/guides/current/Failsafe
Leave a Reply